Posted on

Telephoto lens advice

Telephoto lens advice


What is a telephoto lens?

To put it simply, a telephoto lens is a lens that brings subjects up close. The focal length starts here at 80mm and has no real upper limit. Increasing the focal length changes the depth of an image significantly. The further the focal length moves into the telephoto range, the blurrier the background becomes and the larger the background becomes compared to the subject.

The area of ​​application

There are different areas of application for telephoto lenses, which depend somewhat on the actual focal length . A lot is possible between 80 and over 1000mm focal length .

Telephoto lens for portrait

The effect that telephoto lenses bring with them makes them great for portraits. They separate the person very well from the background and provide significantly more blurring in the background. You have to go a little farther away than you have to with a wide angle or normal lens , but you can clearly see the difference.

As you can see in the example images, increasing the focal length gives you significantly less background on the image. The second effect is the blurring. Although the picture was taken at 200mm with aperture 5, the background looks blurred and the subject stands out much better. However, since it is difficult to photograph a portrait at 200mm and there is often simply no space for this, a telephoto focal length between 80 and 130mm is often used in portrait photography .

Standard telephoto lens

The standard telephoto lens is in the focal length range up to 200mm and is used in travel, nature and sports photography. In this focal length range, you remain unnoticed as a photographer and can simply bring distant subjects closer. When buying, it is worth paying attention to a large open aperture and an image stabilizer, but more on that later.

Super telephoto lens

The super telephoto lens goes far beyond 200mm and is intended for large distances between the subject and the photographer. If something is very far away, it is worth using a super telephoto. The longer the focal length, of course, the stronger the effects that you get through the telephoto lens.

The cons / limitations

There is actually nothing in photography that has only advantages. It is of course the same with the telephoto lens.

Exposure time

The larger the focal length , the faster the exposure time has to be in order not to blur the image. In theory, as explained in the article on the exposure time , at 600mm, for example, 1/600 sec. That is extremely fast, especially in poor light situations, and naturally makes the picture dark. As a result, we usually have to go up with the ISO value or use a tripod.

An image stabilizer can of course also help here and so you can take photos with your free hand with 1/250 of a second, as in this example.

Weight

If you want to take photos from the free hand, you should be aware of one thing. Telephoto lenses are extremely heavy. Yes, not all of them, but you can quickly achieve a decent weight and of course a corresponding size that is not exactly easy to transport.

A tripod is extremely helpful here and you can take pictures of yourself in one place and from there. You can get close enough because of the long focal length .

Teleconverter

If you don’t feel like taking a huge telephoto lens everywhere with you, I have a tip for you. Use a teleconverter. With a telecoverter, the focal length can be extended, but this has disadvantages. I already said: everything has its disadvantages. Depending on the converter, the lens loses 1-2 stops of light intensity.

However, you can combine these and turn a fast 100mm lens into a 200 or even 400mm lens very quickly.

Posted on

Photographing in the fireworks is easy

Photographing in the fireworks is easy

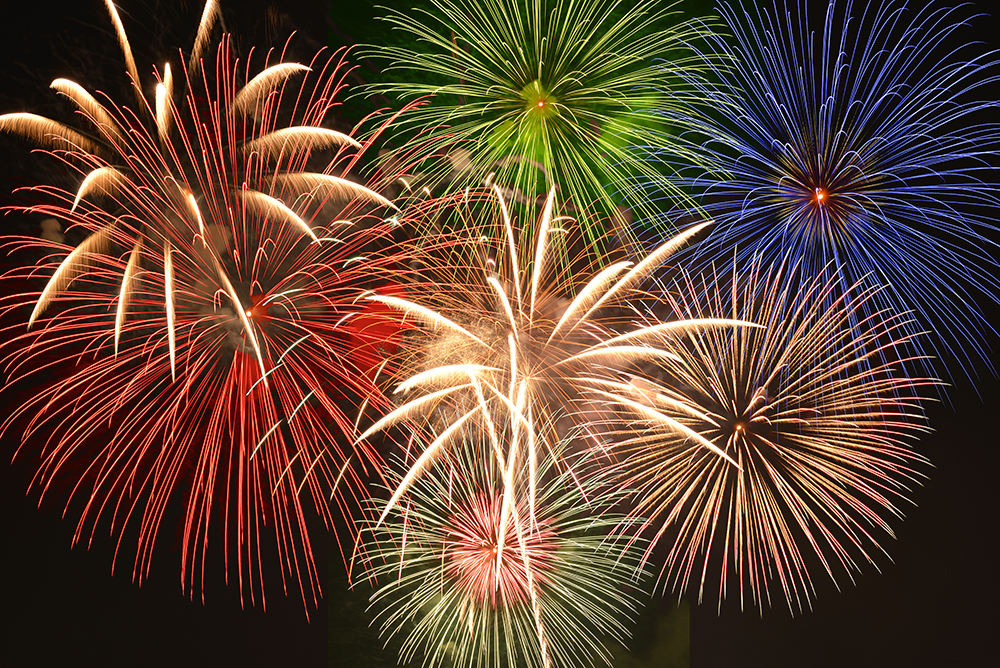
Fireworks are relatively easy to photograph. It should be clear that something like this cannot simply be photographed by hand. With a little luck you can even use compact cameras. If you want more, you should use a manually operated camera. Also recommend a safe stand with a tripod or center punch cushion. In the simplest case, the camera can also be positioned reasonably firmly on a “grain cushion”.

The most important thing when photographing fireworks is that the camera is safely and securely installed throughout the exposure. Because the principle is as follows: The camera exposes for several seconds and captures everything that is going on in the sky. In other words, we’re doing a long exposure .


I always take such night shots with a stable tripod. However, simple tripods are also suitable for lighter cameras, especially if you only need something like this for New Year’s Eve. From around 10 € you can get a simple tripod. Another possibility is the so-called “grain pillow”. To do this, you simply fill z. B. rice or peas in a bag, closes this and thus receives an individual base on which you can align the camera firmly. Disadvantage: Of course, something like this only works on a raised surface such as a table. But if you want to photograph the fireworks outside on New Year’s Eve and not from the balcony, you cannot avoid a tripod.

What must be set on the camera for fireworks?

The very simple way: no manual mode available

I already mentioned it at the beginning: The best thing is that the camera has a manual mode (“M”). If you cannot take photos manually with your camera, you can try the following:

The camera sits firmly on a tripod or something similar. Set the camera’s programmer knob to either AV mode (for Nikon A) or TV mode (for Nikon “S”). Or you simply select the program mode “P”.
However, it must be possible to switch off the flash!
With such compact cameras, however, make sure that you actually only have the sky in the picture and not a brightly lit object or a house wall!

Press the camera’s shutter button. The autofocus won’t find anything (it’s all black) and will eventually adjust to “infinity” – just right for fireworks in the distance. Now the camera initially only sees black and exposed and exposed (hopefully long enough). During this time, however, the fireworks are ignited and wander through the image, so to speak, or leave information on the camera’s chip, which is shown as the tail that you know from other photos or that you want to photograph yourself.

At some point the exposure will end automatically. With luck, you will be as a sufficient number of “tails” of fireworks recorded have. If your camera breaks the exposure immediately after a second even in the dark, it is unfortunately not suitable for this technique. You can easily try it out in a dark room at first.

The camera has a manual mode “M”

Here it gets a lot more interesting. In manual mode, fireworks can be photographed much better at night! After the camera has been placed on the tripod, it starts:

Set the M mode and deactivate the built-in flash here (or leave it folded in).

First manually set the ISO value to 100, at least to the lowest number that is possible.

Set the aperture to 8 or 11.

Set an exposure time of approx. 30 seconds on the camera.

Set the white balance so that the camera yellow light which awaits: So you select “sun” or better yet “light bulb”. Otherwise the photo will be too yellowish.

Manually set the focus to infinity.

If possible, take photos in “RAW mode” so that you can process the images better later.

Wait for the fireworks to really go off and press the trigger!

I put my Nikon on my Triopo tripod and exposed the longest time I could set with the Nikon DSLR: 30 seconds. I continued to work with the settings above: ISO 100 and aperture 8. However, I made a mistake with the white balance: I chose neutral light or “flash”. The light of the fireworks is not white but already very yellowish to red. In addition, the fog scattered the yellowish-reddish light all around.

I used an old analog Nikon wide angle with manual focus, which can easily be connected to modern digital cameras . Due to the long exposure time, I was able to photograph several fireworks following one another on just one picture!

Taking pictures in fog

Actually, I’m only semi-happy with my fireworks photos. For me they are far too red-tinged and not clear / brilliant enough. On the other hand, they are a good example of what fog can do and an incorrect white balance on the camera.
Due to the prevailing fog, all the lights of the city (all the street lighting and also a lot of fireworks that took place on the ground) were reflected and thus also visible in the sky. You have to imagine fog or haze as billions of tiny mirrors that “float” in the air and reflect (unfavorable) light towards the camera. That is simply unfavorable for brilliant images! It’s just like stargazing. The lights of the city are just as annoying there as they are in the haze in the sky.


I will also use a white balance on my camera next time, which corrects tones that are too yellow / too red. The white balance program “incandescent lamp” or “artificial light” would be ideal here. We don’t see it, because our brain automatically corrects something like this: The light from the incandescent lamp is similar to the yellow light from the street lighting, which is disturbing here. But the camera relentlessly reproduces something like that. Without white balance, the photos would get too strong a yellow cast, especially with such long exposure times.

“Catch” the fireworks even longer with long exposure

You don’t necessarily have to rely on e.g. B. Limit 30 seconds. If you have a remote release for your camera (unfortunately I don’t have something like this for my Nikon [yet “]), you can theoretically expose the whole night or capture the entire fireworks display in just one single picture.
The exposure time on the camera is set to “B”. “B” means bulb. This term comes from the old days of photography, in which a small balloon was screwed to the shutter release of the camera using a thin hose and an air pressure was generated by applying pressure, which activated the shutter release. With modern cameras this happens either via a cable or even via radio.
In any case, the camera now exposes exactly until you press the shutter release again. At 100 ISO and over 30 seconds, however, I would close the aperture of the lens further, otherwise the sky will be too bright: From 30 seconds I use aperture 11; from 60 seconds f-stop 16 and from 2 minutes fireworks f-stop 22.

If you want to expose even longer, we recommend using an ND filter . Then, however, it may be that the individual lights of the fireworks get too dark, because they only act on the camera’s chip for a few seconds. It may be possible to make them brighter again later in the image processing by changing the so-called “gradation curve” or by increasing the contrast.

A tip on composition

When photographing fireworks, I always make sure that not only sky + rockets are shown. Personally, that’s a bit too arbitrary for me. I always try to take pictures of other picture elements: trees, for example, or houses that are beautifully illuminated by the colorful fireworks.

If you want to be very colorful, in addition to the long exposure of the actual fireworks, you can manually flash the surrounding houses in the picture with a flash and a weak color filter in front of it during the long exposure. But don’t overdo it here. Because if you only flash very subtly, you will get the impression that this colored light is coming from the fireworks themselves! With such a trick you create an illusion or an even greater expressiveness of the image.

This tip does not always make sense, but it is definitely worth a try for motifs with nearby (up to approx. 20 meters) houses, walls, trees, etc.

Pay attention to the battery consumption

If you have installed your camera on a tripod outside (e.g. on a small hill) and are now waiting for the fireworks to be lit, you have a spare battery for the camera in your pocket as a precaution! The camera quickly drains the battery during long exposures! At least my Nikon DSLR does.

The trick with the black box

Finally, a tip that I already gave in my article about long exposure times: If you have longer exposure times, have a black box with you!
I swing the box in front of the lens in the empty phases, i.e. when a certain time elapses between the individual fireworks (of course so that I don’t touch it). With this shadowing I achieve the following:

The sky is not brightened unnecessarily and the contrast between the sky and the fireworks is increased significantly: the images become more brilliant!

In this way I prevent continuously illuminated elements in the picture from being unnecessarily overexposed (e.g. street lamps).

If someone walks through the picture with a sparkler, it leaves an unwanted tail. I quickly hold the box in front of the lens and then pull it away again just as quickly.

After the aforementioned empty phases, i.e. when new rockets are just rising up in the sky, I release the lens again. Curious looks are guaranteed when you use this technique to photograph the next fireworks display together with other photographers.

Or does your digital camera have a (as real as possible) multiple exposure function? Then you can record several sequences of the fireworks in one picture by double exposures and do not have to expose in a whole piece but several times (shorter) one after the other. Of course, a tripod is also essential here.

Posted on

The aperture in photography

One of the most important factors in photography is the aperture . The aperture is a lamellar opening in the lens that opens and closes. It has two influences on a photo. On the one hand, it controls the brightness and, on the other hand, the depth of field (or depth of field).

General information about the aperture

Surely you know the portraits or macro shots where only a small part of the picture is sharp. The rest disappears in a blur. With this type of image we speak of a shallow depth of field. We sometimes control the size of this area through the aperture and have different areas of application for this. In landscape photography, we want to be as sharp as possible. But for this it is not necessary to close the shutter as far as it will go! Depending on the lens and camera, aperture values ​​of 5.6 or higher are enough to speak of a high depth of field. The opposite are low aperture values. These open the aperture further and ensure a low focus range.

Aperture value

The aperture value is a little bit confusing, because with a higher value we have a closed aperture and with a lower value we have an open one. This is because the aperture value is a fraction. We don’t actually set an aperture of 4, but an aperture of f / 4. This is because the aperture value is calculated from the focal length of the lens and the diameter of the light passage. This explains why lenses are sometimes very thick, but is difficult to remember for beginners.

Aperture step

If that wasn’t too much for you, I have another tip for you. Because we have a certain approach to the aperture values. As you may have already noticed, you cannot set an aperture of 3.8 on your camera ; an aperture of 4 works though … Why?

It has to do with a very simple calculation and logic. If the aperture makes a full step (from 5.6 to 8, for example), only half as much light falls into the camera. Conversely, of course, from f / 4 to f / 2.8 we let twice as much light into the camera. In this case one speaks of an aperture step. This is available in whole steps and in thirds.

Whole aperture steps:

1 – 1.4 – 2 – 2.8 – 4 – 5.6 – 8 – 11 – 16 – 22

In order to be able to adjust the aperture more finely, there are now third steps. These can be found in most cameras between all the steps for the blind. ( 2 – 2.2 – 2.5 – 2.8 ). Many values ​​in photography are based on this aperture value; also the exposure time and the ISO value.

In simple terms, however, you can say that if you turn a setting wheel on the camera three steps in a certain direction, you have halved or doubled the amount of light. Depending on which direction.

The focus range

The area of ​​focus is the area in an image that is in focus. The size of the focus area is controlled, among other things, by the opening of the aperture . If you keep it open, the area of ​​focus will get smaller, and if you close it it will get bigger.

With the autofocus, you can control at which point the image is in focus, through the aperture how far this focus spreads to the front or back. Please note that this focus area spreads on the camera axis. Everything that is left or right of your subject can therefore also be sharp.

Take pictures with the aperture open

There are several advantages to opening the bezel . In this way, you can keep the focus area in your photo small, which makes for a wonderfully focused look in portrait photography or macro photography.

Take pictures with the aperture closed

The complete opposite is of course the closed aperture . The closed aperture ensures that the picture is naturally darker. Less light comes into the camera, so the picture becomes darker. This can be an advantage if we want to expose longer or if we need a large focus area.

Closing the aperture (f / 5.6 -> f / 8 or smaller) increases the focus area . This is great for group pictures or landscape shots, because at this moment we want everything to be sharp. To do this, it is not necessary to close the aperture to f / 22, i.e. as far as it will go. In most cases an aperture of 5.6 is sufficient. That depends on other influences on the sharpness range. I’ll explain this to you now.

Further influence on the focus range

The focus area depends on the distance to the subject and the focal length used . If you take photos at a wide angle, the field of focus (also depth of field) is significantly larger than with a telephoto lens at the same distance.

An example with aperture 2 and a distance of 4 meters:

  • 17mm = 20.92m depth of field
  • 50mm = 0.77m depth of field
  • 200mm = 0.05m depth of field

The distance to the subject has the same influence. Have you ever noticed that the distance to the subject changes the blurring in the background? With a lot of distance the focus area is quite large, with a short distance it becomes smaller and smaller.

Again the example with aperture 2 and a focal length of 50mm

  • 1 meter distance – 0.05m depth of field
  • 2 meters distance – 0.19 m depth of field
  • 5 meters distance – 1.21 m depth of field

So if you want to have blurring in the background of your portraits, you should not only choose an open aperture , but also get close to your subject (and keep a distance from the background).

The connection between all these influences and factors is certainly not easy to understand at the beginning, but over time this becomes easier and easier. With a little practice you will develop a feeling for which combination of aperture , distance and focal length is the right one for the respective situation.

Limits of the lens

You have already learned a lot about aperture and depth of field. As you have probably already noticed, not every lens can set every aperture . The reason for this is usually the zoom. The zoom requires space in the lens. Every moving part takes its toll and usually ensures this limit. This is why you can usually not open the aperture any further, but what is the solution?

Lenses with the largest open aperture are fixed focal lengths. A fixed focal length is a lens without zoom and usually creates f / 1.8 or even more open (f / 1.4 or f / 1.2). There are also zoom lenses that work in a similar field, but these are often very expensive. So if you want to work with a small depth of field, you should use a prime lens.