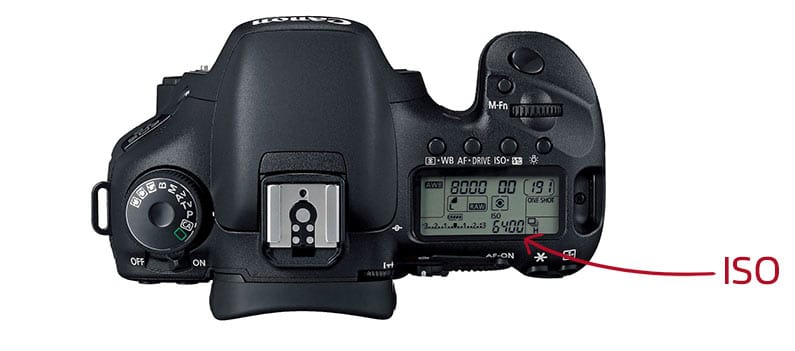
You must have already found a button or an ad with the label ISO on your camera. If you press it, you see a lot of numbers and maybe you don’t know what to set here. Don’t worry, that’s what today is about!
In addition to the exposure time and the aperture, the ISO value is probably the most important value in the exposure of your photo. It controls the brightness of your pictures, but also has other influences.
Origin & functionality
Originally, the ISO value comes from the sensitivity of analog films (ASA). This sensitivity was due to the different sizes of crystals used on the film. Large crystals could absorb more light, but created a so-called grain (noise). If small crystals were used, the film could absorb less light, but the grain became finer and finer and less visible to the eye.
But how does it work digitally now? After all, we can’t make the pixels on our image sensor bigger or smaller. Therefore there is a digital possibility to increase the ISO value. Usually every single pixel sends information to the camera. If this signal is too weak, the light received is too dark. Now we have to increase the sensitivity (the ISO value), which amplifies this signal. This allows the camera to perceive light much better, but unfortunately not only the light is amplified, but also the interference with the sensor and the electronics. We will see this later in the picture as image noise.
How does ISO affect our images?
This can be compared to the human eye. This can also see in the dark, but is then blinded by bright lights. It’s the same with your camera. If you have set the ISO value very high, every light, no matter how small, looks incredibly bright, but you can see with your camera in the dark.
Originally, the ISO value comes from the sensitivity of analog films (ASA). This sensitivity was due to the different sizes of the crystals used on the film. Large crystals could absorb more light, but created a so-called grain (noise). If small crystals were used, the film could absorb less light, but the grain became finer and finer and less visible to the eye.
But how does it work digitally now? After all, we can’t make the pixels on our image sensor bigger or smaller. Therefore there is a digital possibility to increase the ISO value. Usually every single pixel sends information to the camera. If this signal is too weak, the light received is too dark. Now we have to increase the sensitivity (the ISO value), which amplifies this signal. This allows the camera to perceive light much better, but unfortunately not only the light is amplified, but also the interferences of the sensor and the electronics. We will see this later in the picture as image noise.
With the ISO value this is the noise. Noise looks like someone has placed the smoking of a television picture over your photo. This effect is also known from many smartphone cameras that only show muddy pictures without sharpness in the dark.
This is because we perceive sharpness as micro-contrast. So as a small difference between light and dark. However, the edges between these areas are destroyed by noise, which is also a difference between light and dark.
The high ISO value (6400) ensures that you can see the stars, but the details in the grass are completely lost in the noise
How do I set the ISO value?
To set this value on the camera, simply press the ISO button . Then you can use the corresponding adjusting wheel to check how high or low the value should be set.
Like exposure time and aperture , the ISO value is based on aperture steps. In addition, it is based on the power of 2, which doesn’t make it all that easy. But I have an example that might make it easier.
Every step to the right (higher value) makes the picture twice as bright as before and every step to the left makes it half as bright. Got it? Well! Because there are also third steps that allow you to fine-tune the value.
So if you still have intermediate values on your camera, do not worry: this is only for fine adjustment.
When do I use which ISO value
This is now a subject that a lot of completely misunderstand. Because the ISO value is nothing worse. It doesn’t always have to be kept so low that we avoid any noise. The ISO value should support you in your photography and with modern cameras the noise is also less and less.
My tip: Try to find out on your camera when the ISO noise is so strong that you can no longer use an image and when you don’t notice any differences.
For me, it’s pretty easy with all my cameras: You can actually always use ISO 100-800 without seeing any noise anywhere. From ISO3200 everything should be treated with caution. This example can work for you, but it doesn’t have to.
Avoid image noise
Noise does not have to be a bad thing either – although this image is very noisy, you can still see enough details and can forgive the noise.
Do you now have to take photos in the dark and want to avoid the noise? Then I now have a few tips for you. First of all, a larger image sensor always ensures less noise, as the pixels on the sensor have significantly more space and can therefore absorb more light. But a new camera is not the universal solution. Better take a look at what can still be extracted from the other values. We have exposure time and aperture , which can possibly be set a little brighter and thus relieve the ISO value.
But be careful: it is better to take a noisy picture than a blurred or blurred one. Viewers of the picture are more forgiving of noise than blurred or even blurred pictures.
An alternative would be to take the photo in RAW and remove noise from the image. There are many image processing programs for this that can pick up the noise in the image. There are many possibilities here, you can find your own way.

