Posted on

The Digital single-lens reflex (DSLR) camera purchase advice

The camera with the most widespread use is the single-lens reflex camera or DSLR. It is suitable for a large number of photographers and can be used both in the beginner area and in the professional environment. In this article we will clarify whether a SLR camera is worthwhile for you or not. Finally, I would like to recommend a few DSLRs that are particularly suitable for beginners, but also for advanced users and professionals. But remember: a better camera doesn’t make a better photographer. It doesn’t hurt to start small and adapt your equipment to your experience. Your driving school car didn’t have 800PS either 😉

How does a DSLR work?

The mirror reflex camera is a camera that works with a mirror. DSLR stands for D igital S ingle- L ens R eflex. The mirror comes from the analog era, because back then you had to be able to look through the lens without exposing the film. The mirror is thus the switch between the optical viewfinder and the image sensor.

If the DSLR camera is switched off (or has nothing to do), the mirror is also folded down and we can look through the lens through our viewfinder. The moment we take a photo, the mirror folds up, covers the viewfinder and releases the image sensor. Then it folds down again. That is the reason why you sometimes see nothing with DSLRs while taking pictures.

Tips for taking photos with the DSLR

I would definitely advise you to use the viewfinder, although many cameras can also show the image live on the display thanks to digital technology. The disadvantage of the display, however, is that it is reflective and sometimes makes it difficult to see something. Of course, we don’t have that with the viewfinder 😉 these cameras are also built to take photos with the viewfinder. The complete autofocus and the power of these cameras are in here and it is definitely worth keeping the display outside.

 Advantages of the SLR camera

high image quality

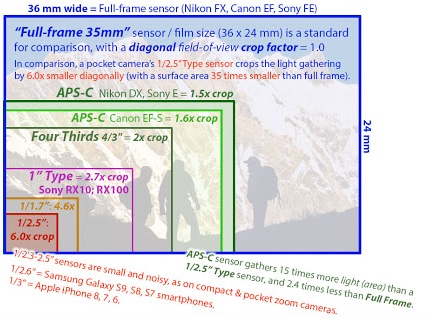
To put it simply, a larger image sensor often results in better image quality. Well, the smallest image sensor in a DSLR is an APS-C sensor. These sensors are far superior to those of compact cameras. Due to their large size, they have a higher resolution or can handle more megapixels much better than their smaller colleagues from the compact camera. The reason for this is that with a larger sensor, more light per pixel arrives and that ensures a significantly better quality, especially in poor lighting conditions.

In good situations, all cameras can deliver a good result, but in every one? This is something demanding, which usually requires appropriate equipment.

Versatility of the DSLR

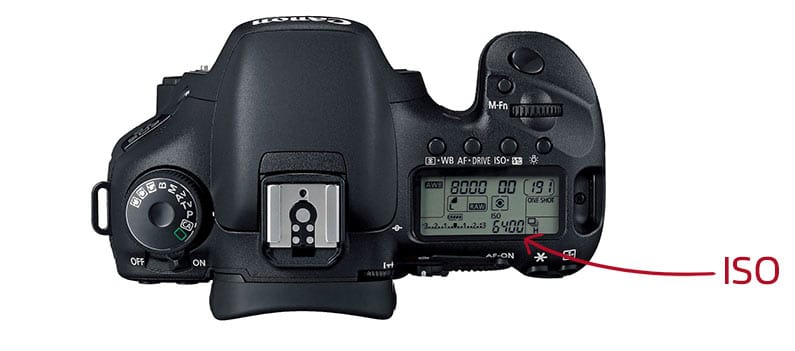
An SLR can do everything. Due to the possibility of interchangeable lenses and the almost endless setting options, we can use them in every area, which is also the reason that they can be found in every area. By screwing on another lens, we can bring distant subjects closer or capture gigantic landscapes in a single photo. The setting options of the DSLR are not only aperture , ISO and exposure time , but also white balance , autofocus and so much more. As a result, they are definitely superior to compact cameras, which were made for everything, but which cannot be specialized in one particular area.

Battery life

I still compare the subject with compact cameras, because DSLRs and DSLMs represent the next step after a compact camera or smartphone. The battery life is definitely enormous. How long can your cell phone or compact camera run before you need a new one? For me it is 7-8 hours (with two rechargeable batteries in the battery grip) and up to 4000 photos. The whole thing depends a bit on the situation, but many should realize that it is significantly more than what is possible with cheap cameras. So a big plus for the DSLR.

Speed

Probably the most important point from my point of view. So as a professional you have completely different demands on the camera. But even for beginners it is a huge advantage if the camera does not have to think for 1-2 seconds after triggering before we can look at a picture, but if everything is displayed immediately and live. I’m not talking about as many pictures as possible in the serial picture, but about general handling. Do you always want to wait a moment for a picture to appear? Or until the camera has finally written the image to the memory card? Probably not … But there is more, because the autofocus is of course much faster and more reliable. Setting the focus in milliseconds ensures that you really don’t miss any more moments!

Lenses

Maybe someone knows this well-known picture, which shows Canon’s lens park. This gigantic mass of lenses also gives us an incredible number of possibilities. There is a suitable lens for every situation, so nothing is left to be desired. What is often solved with an extreme zoom lens in compact cameras can now be solved with a variety of specialized lenses. But of course you don’t always have to go to the actual manufacturer of the camera if you want the right lens. You can also work with third-party manufacturers such as Tamron or Sigma. These offer a wonderful and, above all, often cheaper alternative.

Disadvantages of the DSLR

Nothing is perfect. Of course, the SLR camera also has disadvantages and I’ll show you a few reasons why you shouldn’t use DLSRs right away.

Weight and height

Please do not get me wrong. There are also small lenses and small DSLR cameras, but for many this factor is crucial. Imagine you are planning a vacation and you have to prevent a camera with 3 lenses in your luggage … A compact camera would be tempting. For example: a good full frame DSLR with a standard lens.

  • Canon 700d + KIT: approx. 800g
  • Canon 6d II + 50 1.2 + 35 1.4 + 24-70 2.8: 2.8 kg

These are all exemplary values ​​now, but larger cameras and lenses ensure that they take up more space and of course additional weight. It doesn’t really matter whether you use the DSLR or a system camera (DSLM). The DSLM is slightly ahead here, but in the end that doesn’t mean much. You have to be aware that you have a big and heavy camera with you.

Your own claim

This is something that I noticed again and again on my photo trips. When I travel with a DSLR, I need to take good photos. Over time you start to professionalize everything and look for the perfect photo. After all, a huge camera was dragged around with you all the time that cost several thousand yours. So why should you photograph something that you could have photographed with your mobile phone? Maybe it’s just me, but it can happen to you that you develop too high demands on your pictures and start to forget the actual memories and just stop taking those typical mobile phone photos.

Who should buy a DSLR?

A DLSR is not for everyone. If you are looking for a point and shoot camera, you should go for a compact camera. We are in an area where our purchase was unnecessary if we did not capitalize on the potential of this camera. So who is an SLR camera for?

  • Ambitious beginners who want a lot of performance for little money should use a DSLR or DSLM.
  • If you want a camera system that you can upgrade easily. (with new lenses or purchased lenses fit on new cameras again)
  • You are looking for an extremely wide range of accessories. Because the DSLR / DSLM market is extremely large and there is actually nothing that does not exist 😉
  • You want to rely on reliability and speed.

Some buy recommendations

Entry-level DSLRs

If you are looking for a cheap entry into DSLRs, the three-digit models from Canon or Nikon are very well served. Here you can get the models even cheaper if you buy older used ones. Canon’s 650d is still a good camera today!

Canon cameras with KIT lens: Canon 2000D * – Canon 1300D *  – Canon 800D *

Nikon cameras with KIT lens: Nikon D5300 * – Nikon D5100 *

Sony cameras with KIT lens: Sony Alpha 68 *

Advanced DSLRS

Canon camera with KIT lens: Canon 77D *

Nikon camera with KIT lens: Nikon D7200 *

Professional DSLRs with full frame sensors

Canon full format entry: 6D II + kit lens *

Nikon full frame entry: D750 *

Posted on

The ISO value of your camera

The ISO value of your camera

You must have already found a button or an ad with the label ISO on your camera. If you press it, you see a lot of numbers and maybe you don’t know what to set here. Don’t worry, that’s what today is about!

In addition to the exposure time and the aperture, the ISO value is probably the most important value in the exposure of your photo. It controls the brightness of your pictures, but also has other influences.

Origin & functionality

Originally, the ISO value comes from the sensitivity of analog films (ASA). This sensitivity was due to the different sizes of crystals used on the film. Large crystals could absorb more light, but created a so-called grain (noise). If small crystals were used, the film could absorb less light, but the grain became finer and finer and less visible to the eye.

But how does it work digitally now? After all, we can’t make the pixels on our image sensor bigger or smaller. Therefore there is a digital possibility to increase the ISO value. Usually every single pixel sends information to the camera. If this signal is too weak, the light received is too dark. Now we have to increase the sensitivity (the ISO value), which amplifies this signal. This allows the camera to perceive light much better, but unfortunately not only the light is amplified, but also the interference with the sensor and the electronics. We will see this later in the picture as image noise.

How does ISO affect our images?

This can be compared to the human eye. This can also see in the dark, but is then blinded by bright lights. It’s the same with your camera. If you have set the ISO value very high, every light, no matter how small, looks incredibly bright, but you can see with your camera in the dark.

Originally, the ISO value comes from the sensitivity of analog films (ASA). This sensitivity was due to the different sizes of the crystals used on the film. Large crystals could absorb more light, but created a so-called grain (noise). If small crystals were used, the film could absorb less light, but the grain became finer and finer and less visible to the eye.

But how does it work digitally now? After all, we can’t make the pixels on our image sensor bigger or smaller. Therefore there is a digital possibility to increase the ISO value. Usually every single pixel sends information to the camera. If this signal is too weak, the light received is too dark. Now we have to increase the sensitivity (the ISO value), which amplifies this signal. This allows the camera to perceive light much better, but unfortunately not only the light is amplified, but also the interferences of the sensor and the electronics. We will see this later in the picture as image noise.

With the ISO value this is the noise. Noise looks like someone has placed the smoking of a television picture over your photo. This effect is also known from many smartphone cameras that only show muddy pictures without sharpness in the dark.

This is because we perceive sharpness as micro-contrast. So as a small difference between light and dark. However, the edges between these areas are destroyed by noise, which is also a difference between light and dark.

The high ISO value (6400) ensures that you can see the stars, but the details in the grass are completely lost in the noise

How do I set the ISO value?

To set this value on the camera, simply press the ISO button . Then you can use the corresponding adjusting wheel to check how high or low the value should be set.

Like exposure time and aperture , the ISO value is based on aperture steps. In addition, it is based on the power of 2, which doesn’t make it all that easy. But I have an example that might make it easier.

Every step to the right (higher value) makes the picture twice as bright as before and every step to the left makes it half as bright. Got it? Well! Because there are also third steps that allow you to fine-tune the value.

So if you still have intermediate values ​​on your camera, do not worry: this is only for fine adjustment.

When do I use which ISO value

This is now a subject that a lot of completely misunderstand. Because the ISO value is nothing worse. It doesn’t always have to be kept so low that we avoid any noise. The ISO value should support you in your photography and with modern cameras the noise is also less and less.

My tip: Try to find out on your camera when the ISO noise is so strong that you can no longer use an image and when you don’t notice any differences. 

For me, it’s pretty easy with all my cameras: You can actually always use ISO 100-800 without seeing any noise anywhere. From ISO3200 everything should be treated with caution. This example can work for you, but it doesn’t have to.

Avoid image noise

Noise does not have to be a bad thing either – although this image is very noisy, you can still see enough details and can forgive the noise.

Do you now have to take photos in the dark and want to avoid the noise? Then I now have a few tips for you. First of all, a larger image sensor always ensures less noise, as the pixels on the sensor have significantly more space and can therefore absorb more light. But a new camera is not the universal solution. Better take a look at what can still be extracted from the other values. We have exposure time and aperture , which can possibly be set a little brighter and thus relieve the ISO value.

But be careful: it is better to take a noisy picture than a blurred or blurred one. Viewers of the picture are more forgiving of noise than blurred or even blurred pictures.

An alternative would be to take the photo in RAW and remove noise from the image. There are many image processing programs for this that can pick up the noise in the image. There are many possibilities here, you can find your own way.

Posted on Leave a comment

What is Camera Sensor?

In the broadest terms, a digital cam sensor is a solid-state device that is sensitive to light. When photons are focused on the sensing unit by your DSLR’s lens, those photons are signed up and, if sufficient build up, are translated into digital signal to produce an image map you can see on your cam’s LCD and transfer to your computer for editing.

The process of making a sensing unit

What basically happens is that wafers of silicon are used as the base for the integrated circuit, which are developed through a process called photolithography. This is where the patterns of the circuitry are repeatedly predicted onto the (sensitized) wafer, before being dealt with so that only the pattern remains. Funnily enough, this bears many similarities to traditional photographic processes, such as those utilized in a darkroom when developing movie and printing.

This process develops countless tiny wells known as pixels, and in each pixel there will be a light delicate component which can pick up the number of photons have come to that specific place. As the charge output from each location is proportional to the intensity of light falling onto it, it ends up being possible to recreate the scene as the professional photographer initially saw it– however a variety of processes need to take place before this is all possible.

As sensing unit is an analogue device, this charge initially needs to be converted into a signal, which is magnified before it is converted into a digital kind. So, an image may eventually look like a collection of various items and colours, but at a more fundamental level each pixel is merely provided a number so that it can be comprehended by a computer system (if you zoom into any digital image far enough you will be able to see that each pixel is simply a single coloured square).

A well as being an analogue device, a sensor is also colour blind. For it to sense different colours a mosaic of coloured filters is put over the sensing unit, with twice as lots of green filters as there are of each red and blue, to match the heightened level of sensitivity of the human visual system towards the colour green. This system implies that each pixel only gets colour information for either red, green or blue– as such, the values for the other 2 colours needs to be thought by a process known as demosaicing. The option to this system the Foveon sensor, which uses layers of silicon to take in various wavelengths, the result being that each place receives complete colour info.

The Megapixel myth – Is more much better?

At one point it was essential to establish sensing units with a growing number of pixels, as the earliest types were not adequate for the needs of printing. That barrier was quickly broken, but sensors continued to be developed with a greater number of pixels, and compacts that once had two or three megapixels were quickly changed by the next generation of 4 of 5 megapixel versions. This has actually now escalated up to the 20MP compact cams on the marketplace today. As helpful as this is for manufacturers from a marketing viewpoint, it did little to educate customers regarding how many were needed-and more notably, just how much was excessive.

More pixels can mean more in details, but the size of the sensor is crucial for this to hold true: this is essentially because smaller pixels are less efficient than larger ones. The main attributes which separate images from compact cameras (with small sensors) and those from DSLRs, Compact Sytem Cameras or compact cameras with a large sensor are dynamic range and noise, and the latter types of camera fare better with regards to each. As its pixels can be made larger, they can hold more light in relation to the noise created by the sensor through its operation, and a higher ratio in favour of the signal produces a cleaner image. Noise reduction technology, used in most cameras, aims to cover up any noise which has formed in the image, but this is normally only attainable by compromising its detail. This is standard on basic cameras and usually cannot be deactivated, unlike on some advanced cameras where the option to do so is provided (meaning you can take more care to process it out later yourself).

The increased capacity of larger pixels likewise indicates that they can include more light before they are full– and a complete pixel is essentially a blown emphasize. When this occurs on a largely populated sensing unit, it’s easy for the charge from one pixel to overflow to neighbouring websites, which is known as flowering. By contrast, a bigger pixel can consist of a greater range of tonal worth’s before this happens, and specific ranges of sensor will be fitted with anti-blooming gates to drain pipes off excess charge. The drawback to this is that the gates themselves require space on the sensor, and so once again jeopardize the size of each specific pixel.

Kinds of Sensors

Capturing the photons effectively and precisely is the challenging part. There’s a lot more to understand about sensors than the variety of megapixels. There are great reasons that one 15 megapixel sensor and its electronic devices produce merely excellent photos, whereas a different sensing unit in the very same resolution range is capable of marvellous results.

There are two primary types of sensing units utilized in digital video cameras, called CCD (for charge paired gadget) and CMOS (for complementary metal oxide semiconductor). Thankfully, today there is little need to understand the technical differences in between them, or, even which kind of sensor lives in your camera. Early in the game, CCDs were the choice for premium image capture, while CMOS chips were the low-cost alternative utilized for less important applications. Today, innovation has advanced so that CMOS sensors have actually conquered essentially all the benefits CCD imagers formerly had, so that CMOS has actually ended up being the dominant image capture gadget, with just a few cams using CCDs staying.

Posted on Leave a comment

2020 TIPA Winning Cameras and Lenses

In Madrid The Technical Image Press Association(TIPA) announced the winners of the 2020 TIPA World Awards.

What is TIPA?

The TIPA Award is widely regarded as one of the best known and most prestigious photography awards. . TIPA both recognise and honour industry companies and their products and serve as an important benchmark and guide for consumers in making their purchasing decisions.

Since 1991, the TIPA World Awards logos have shown which are the best photographic, video and imaging products each year. For over 25 years, the TIPA World Awards have been judged on quality, performance and value, making them the independent photo and imaging awards you can trust. I cooperation with the Camera Journal Press Club of Japan (www.tipa.com)

The TIPA jury is made up of the world’s best-known photography and imaging professionals.

2020 TIPA World Awards Process

Finalists are usually voted on at the TIPA general assembly by representatives from TIPA member magazines from around the world. The assembly was originally scheduled for mid-March in Las Vegas. However, when travel restrictions were established, the TIPA board implemented product recommendations and an online voting procedure for members globally.

Based on detailed tests and comparisons, a list of candidates and laureates are compiled.

List of 2020 TIPA winning products:

Cameras

  • Best DSLR Advanced Camera: Canon EOS 90D
  • The best DSLR Expert camera: Nikon D780
  • Best DSLR Professional Camera: Canon EOS-1DX Mark III
  • Best APS-C Advanced Camera: Nikon Z 50
  • Best APS-C Expert Camera: Sony A6600
  • Best APS-C Professional Camera: Fujifilm X-Pro 3
  • Best Full-Frame Expert Camera: Sigma fp
  • Best Full-Frame Professional Camera: Sony A7R IV
  • Best Full-Frame Photo / Video Camera: Panasonic Lumix DC-S1H
  • Best Medium Format Camera: Fujifilm GFX100

Lenses:

  • Best DSLR – Prime lens: Tamron SP 35mm f / 1.4 Di USD
  • The best DSLR macro lens: Laowa 100mm f / 2.8 2x Ultra Macro APO
  • Best DSLR – wide angle zoom lens: Tokina ATX-i 11-16mm f / 2.8 CF
  • The best DSLR – professional lens: Nikon AF-S Nikkor 120-300mm f / 2.8E FL ED SR VR
  • The best MFT lens: Panasonic Leica DG Vario-Summilux 10-25mm f / 1.7 ASPH
  • Best without mirror – Prime Standard lens: Nikkor Z 58mm f / 0.95 S Noct
  • The best mirrorless – wide-angle zoom lens: Sigma 14-24mm f / 2.8 DG DN Art
  • The best without mirror – Standard zoom lens: Sigma 24-70mm f / 2.8 DG DN Art
  • The best mirrorless – Telephoto zoom lens: Canon RF 70-200mm f / 2.8L IS USM
  • Best Professional Portrait Photo Lens: Canon RF 85mm f / 1.2L USM (DS)

Compact cameras

  • Best Expert compact camera: Sony RX100 VII
  • Best Vlogging compact camera: Canon PowerShot G7 X Mark III
  • Best Premium Compact Camera: Fujifilm X100V

Posted on Leave a comment

Sony-D Lenses

The short answer – Sony-D lenses are Sony-A lenses that have Advanced Distance Integration. D lenses have 8 contacts, non-D lenses have 5 contacts.

Buying Sony lenses could be confusing. So before I go straight to the explanation of what is Sony-D, I will explain the main differences and the evolution of the Sony lenses.

Sony produces cameras with two lens mount systems: E-mount and A-mount. E-mount is used on mirrorless camera bodies. While A-mount lenses are for the standard Sony unique Translucent Mirror type camera bodies. Yet, using the Sony lens adaptors like LA-EA1, LA-EA2, LA-EA3 or LA-EA4, A-mount lenses can also be used effortlessly on E-mount cameras.

The A-mount was originally Konica Minolta A-mount camera system, which is now used with Sony. Sony A-mount  lenses are optically, mechanically and electrically identical to their Minolta predecessors Therefore, all Minolta AF (i.e. Minolta a-mount) lenses from Minolta are compatible with Sony alpha cameras. The older Minolta lenses for film cameras could be used on modern Digital SLR cameras.

The list of existing Sony A-mount lenses on Wikipedia.

Sony-A mount lenses in our web shop.

Also, could be confusing that the Sony-A mount is also called Sony α (the lower case to Greek letter alpha, often transliterated as Sony Alpha). To make it more complicated, Sony has caused even more confusion. Before, if the camera was an Alpha, it had an A-mount or alpha mount. If it was a Nex camera, it had an E-mount. Sony has come out with Alpha E-mount cameras. So it is good to be aware that not all Alpha cameras have Sony-A mount. If the camera says E-mount, it is not compatible with Minolta (and Sony-A) lenses without the Fotodiox lens mount adaptor. This found this website very useful when it comes to lens and camera compatibility.

Of course, as like many other models the Sony lenses are also going through transformation and development. The old Minolta lenses are not all D lenses, while most modern Sony-A lenses are all D lenses. You can quickly tell if a lens is a D lens or not by counting the number of contacts on the lens mount. D lenses have 8 contacts, non-D lenses have 5.

I have collected here some of the best explanations from different forums that explain why Sony-D lenses are better than non-D lenses:

” That doesn’t have anything to do with the ‘D’ designation. In Minolta/Sony ‘talk’ the ‘D’ indicates that the lens has the ‘D’ chip, which gives distance information to the body. You’re thinking that the ‘D’ means that the lens is optimized for digital cameras. However, as Minolta used the ‘D’ before digital came out.”

“Sony now uses the term “distance encoder” in its lens descriptions, which as far as I know means the same thing as “Advanced Distance Integration” (ADI). Personally, I’ve never noticed that using ADI makes much difference in results.”

“The Minolta 24-105mm f3.5-4.5 (D) Lens was one of the first lenses with ADI (Advanced 
Distance Integration) flash metering system. The D indicates Distance integration”

“Sony-D-compatible” means the lens has 8 electrical contacts rather than 5 which allows additional data to be exchanged between camera body and lens, and that the lens sends focus distance information back to the body. The body can use the distance information to adjust the flash output if you select ADI flash mode. 8 pin lenses started appearing with the Minolta xi range (about 1993, I think), but ADI only came in about 2000 (with the Minolta 5/7/9 series cameras). Many treasured legacy lenses (e.g. the Beercan) are only 5 pin, and even today some current lenses are still only 5 pin, e.g. the excellent Tokina 11-16/2.8.”

” The ‘D’ function was originally designed by Minolta to help with flash exposures when the subject was against a reflective background. The ‘D’ lenses were designed to work with the 5600HS D flash, and a body that was able read the ‘D’ distance information.

“This is how it works: Suppose you wanted to take a picture of a subject standing 10′ in front of you. Two feet behind the subject is a highly reflective surface. Normally, if you try and take a picture in this type of situation, the picture would come out with the subject being underexposed. This is because the light from the flash bouncing back from not only the subject, but the reflective background. Because of this strong reflection, the light output from the flash would be cut off before the subject is properly illuminated.”

“With the ‘D’ system in place, the camera would know that you are focusing on a subject ten feet in front of you. Therefore the reflection from the background would be disregarded, as it is further away from your focused point. If you were to shift focus to the reflective background, then the camera would then measure the light from the reflective background and not the darker foreground.”

“I believe every Minolta/Sony DSLR from the Maxxum 9 could take advantage of the ‘D’ chipped lenses and ‘D’ flashes. I’m not sure if Sony was found other uses for the distance information in the newer cameras.”