Do you know what the white balance is? But you should, because after the three exposure values ( exposure time , aperture , ISO ), white balance is the most important in photography. The other values deal with the brightness of the picture, this deals with the color.
1 The white balance in digital cameras
2 Shoot RAW for better white balance
3 Adjust the white balance manually
4 When do I hire something?
5 The gray card
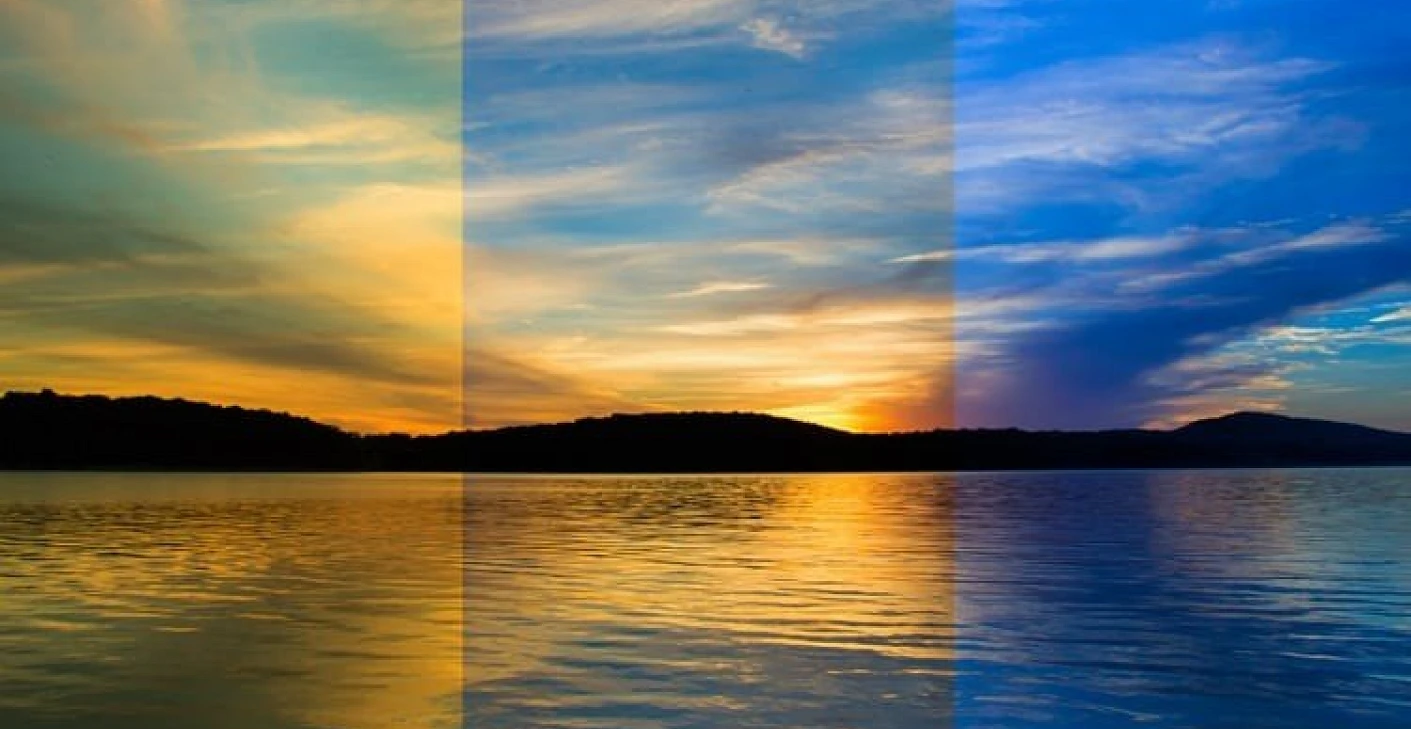
We need the white balance to compensate for the different light colors. You have probably already noticed yourself, the sunset or a lightbulb is very orange, we go into the cellar and turn on the neon tube, the light is very cold. Our brains can do that and that color difference doesn’t look that extreme.
The white balance is supposed to compensate for this and the aim of the white balance is to make white look white.
This color temperature is given in Kelvin and is very easy to remember with fire. The hotter the fire, the more bluish it becomes. Same with white balance. The hotter / higher I set the Kelvin number, the bluer the picture becomes.
The white balance in digital cameras
At the same time we had to change the camera film to change the white balance. Today a simple adjustment of the camera is sufficient. In many situations, the camera should give a good result with an automatic white balance. It automatically searches for the whitest (most color-neutral point). The camera finds this in most situations and can, if necessary, switch to the brightest point of the image if no suitable neutral point can be found. This point is then used as a reference to correct the color of the image.
Of course there are situations in which the automatic white balance just cannot work. If you photograph sophisticated subjects that do not offer neutral colors, for example, a color cast occurs. This is the case, for example, at night or with a picture that only consists of bright colors.
In all normal situations, the automatic white balance (also AWB) delivers great results. At least for normal demands. But I’ll get to that in a moment 🙂
Shoot RAW for better white balance
The RAW format offers something incredible. Because your camera does not apply color correction until after the photo has been created, we can change it in RAW format. The RAW format is a file that, uncompressed and unchanged, contains all of the information that the camera can capture. The white balance is set, but can be changed without loss in image processing with a RAW file. This does not work with a JPG (except for minimal changes).
Is RAW the solution
Isn’t the solution just to always shoot in RAW and do everything in image processing? Definitely NO. Although I have this option, I almost exclusively take photos using completely manual white balance. The pictures already look good in the camera and I can assess them directly and show them to the customer without editing them beforehand. Everyone gets a much better idea of the result.
Adjust the white balance manually
Like the exposure, the white balance can of course also be set manually. I already said that the automatic does a great job, so why a manual white balance? This is especially important if you want to keep a constant visual style in a report. All images always have the same color scheme and do not change constantly because the camera is of the opinion that the color should now be 1000 K colder.
Furthermore, the coloring can be controlled much more finely. Each camera has its own color scheme. With 100 cameras, different models and manufacturers, you can set everything exactly the same (same exposure / AWB) and still get different results. This can be counteracted by manually setting the white balance. An example: If I take photos in a park at sunset and use the AWB, my pictures are significantly more yellow than with manual 5500 K. That’s why I take photos on 5500K to make the pictures look the way I would like them to. The closer I get to this result, while taking pictures, the less work I have in image processing.
When do I post something?
- If you are at the beginning of your photography and have not yet understood the concept, put the Karma on AWB and you will get 90% good results.
- As soon as you already know something better and want to experiment a little, you can apply the defaults or the completely manual value to different situations.
- If you want to film, you should definitely work with a manual white balance so as not to change the color in the middle of the film.
- If you want to get the most out of your pictures, deal with white balance in the long term and learn how to apply it to different situations.
The gray card
Now it is getting more professional, because with a gray card we offer the camera a neutral surface with which it can determine the white balance much better. We can say how the white balance should be measured and from where, and get a much more precise result.
Some write that you can have a sheet of white paper or just any white surface. I advise against that. Every surface has a specific color. The wall was painted in eggshell and not in white and it doesn’t work anymore. Who tells you that the sheet of paper is 100% white? Your own eye may even be wrong here. A gray card can help here, but the result will only be perfect with experience and you can get it by trying out 😉