Posted on

How to Overcome the Problem of Converging Verticals

Converging Verticals

When taking photos of structures one of the challenges that confronts professional photographers is that of Converging Verticals?

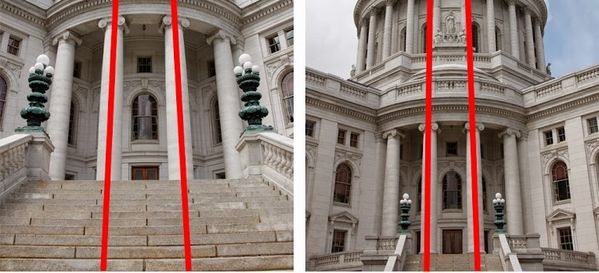
Converging Verticals is a term utilized to describe the impact in images when 2 parallel lines in an image (such as the two sides of a building) appear to get closer (converge)- as if they are leaning in towards one another at the top (as in the picture to the left which is of the Rialto towers in Melbourne- towers that do not get narrower towards the top up until the last few floorings).

The result is most obvious when you angle your camera up when taking a picture of a high structure in an effort to fit all of it in. It’s particularly obvious when utilizing a wide angle lens.

What should a photographer do about converging verticals?

Professional photographers have a number of alternatives available to them.

Improve it – as with all types of distortions in photography- one alternative is to improve it and utilize the Converging Verticals to attain a more remarkable image. You can enhance the assembling lines, however, getting closer to the structure, angling your video camera even more and by using wider angle lenses.

Reduce it – if you desire to avoid the converging verticals in electronic camera you will most likely need to move further back from the structure that you’re photographing. This will mean you will probably get more of the foreground in your end image- but you can always crop this later on. Another method to get more parallel to the building is to take the shot from higher up.

Correct it – if you are not able to alter the point of view that you are shooting from and just end up with assembling lines in your shots another option is to do some post production editing. Most image modifying software will have some way of doing this. For example, in Photoshop Elements there’s a ‘Transform- Viewpoint’ option in the ‘Image’ menu. This is how the image to the right had its converging verticals corrected.

Modification Lenses – finally, if you have a budget plan and will be taking a great deal of architectural images you may like to invest in a unique lens that has the capability to correct converging verticals. These Viewpoint Control/Tilt Shift lenses are able to move the lens axis (or optical centre) to make up for the distortion. Such lenses are not inexpensive – so unless you’re going to be getting seriously into the photography of buildings you may wish to utilize one of the other choices mentioned above to repair the problem of converging verticals.

Posted on

How to Prepare Your Images for Printing

ICC-color-profile - Prepare Your Images for Printing

Select a Picture

When you prepare your images for printing take note of which pictures you like when you look at them on your phone or computer. Of course, it is an important decision what are going to hang on your wall. Especially if it is going to be here for a long time. Your choice is probably depends on the emotions it evokes, the colours or the technical excellence of the picture. Find the exact image that you are looking for.

File Format and Resolution

When you prepare your images for printing for the optimal production use the highest resolution available, don’t change the resolution and don’t resize up or down your photo. Ideally you don’t want to compress your image at all. You can test your picture in some easy-to-use configurator (like WhiteWall) to optimise your file and to achieve the best possible quality. Save it with 8-bit colour and an sRGB colour space.

Colour and Brightness

Don’t forget that colour and brightness can appear different on a monitor than they do in print. There are three reasons for this. The first reason is that a monitor is illuminated and the paper isn’t. Therefore a monitor a monitor can display a photo much brighter than the picture actually is (which is how it will look printed). The second reason is that different papers have their own base tone. It means that a pure white will look different from appear to paper, affecting the overall brightness of the colour. The third reason is that depending on the specifications of the printer such as the dots per inch (DPI), the print-head capability and the type and quality of ink/toner used is also going to affect the colour and the print quality.

For Soft Proofing Use ICC Colour Profiles

What is Soft proofing?  lets you temporarily simulate how an image will appear on another device, such as a printer, by using only a computer monitor. An ICC profile is a set of data that describes the properties of a colour space, the range of colours (gamut) that a monitor can display or a printer can output. The most widely used colour space is Adobe RGB (1998). If you have a calibrated monitor, ICC profiles are the perfect way to asses how your pictures will look on the final product. You can find downloadable ICC colour profiles on the internet for many product options.

Do Test Prints

If you do not have a calibrate monitor or if you don’t want to spend too much time assessing the variables of different things that are affecting your final product, you can do a test printing, which is a hard proof option to see if you need to change anything in order to have a perfect photo.

Best Camera for Photo Printing

If you want to take photos to print them out, perhaps choosing the right camera is the most important. Please notice that print size doubles, the megapixels required increases as well. Therefore, you can make a nice 8″ x 10″ print with a 6 or 8 megapixel camera. But to make a real photo quality 16″ x 20″ print, you would need between 24 and 30 megapixel camera.