What is the secret of fascinating photos? Think about it, I am always asked which camera, lens or setting I used to take this or that photo. Seldom does anyone ask: “How did you come up with this motive?” The subject is always important to me – no matter which camera I use to take my picture. Therefore, I would like to familiarize you with the search for the main subject, one of my most important lessons in composition – what you really want to put in scene. Because this way your photos will be even better!
Who is the main actor in your photo?
Shortly after buying my first SLR camera, I bought a cool 10-20 mm wide-angle lens from Sigma. Wow what a dimension. Now I could get the whole world in one photo. But when I look back today, this visual excess has overwhelmed me. What should I focus on? Photos are like a good film: there is a leading actor. The audience will recognize it, and everything in your composition will help to set it perfectly in scene: light, perspective, focus, design elements and, last but not least, the plot.
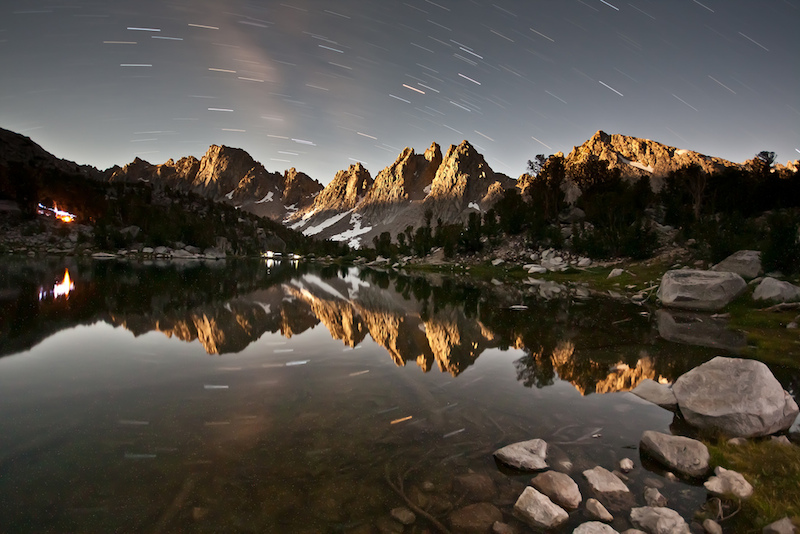
Make what is unique in your photo and in the situation visible – go very close and throw out everything that is unimportant. Here I only photographed the reflection of the tree.
What do you see that fascinates you as a motive?
Who should be the main protagonist of your photo? I would like to share with you some tips and techniques that will help you sharpen your focus on the main actor. But the first impulse has to come from you. Who or what do you want to show – how and in what way?
Typical challenges in our subject search
If the subject is too small, the viewer of your photos may not recognize it as the main subject.
Are there too many (unimportant) things in the picture? Oh dear, then the meaning of your photo may be lost.
Do whatever you can to find your subject. Your eyes and your brain don’t make it easy for you. They are the perfect combination for an exciting deception. Because if you see the subject, your head takes over the image processing without being asked. Everything that is not important is cut away. But your camera can’t! Your eyepiece is merciless. It shows everything that you depict in the frame and in the four corners of your photo. Stay tuned and keep practicing the technique!
Here I have 5 tips for you to find your main subject
5 tips to find your main subject
Find what fascinates you
What made you stop before considering taking this picture? That should become your main subject. A great light situation? An exciting face?
How can you show the fascination in the picture?
Is the subject clear enough in the picture? Is something disturbing the effect? From now on your mission is: Make the uniqueness of the situation visible!
Separate yourself from the unimportant
Before you doubt your technique or your inability, there is usually too much of what you have in the photo. We’re still learning how to clean up your photo. Because less is more and exactly the little and the emptiness emphasizes your main motive.
What can you show and what not?
If the subject is personal – the mood of the evening or the pet that means a lot to you – that’s okay. But the connection to you cannot always be shown in the photo. Be critical, think about the effect when a stranger looks at your photos. Good photos work without explanation.
Have perseverance
Many of my photos that didn’t turn out so well were just not good because of my impatience. Stay tuned to your idea and your motive. Take one more photo and try a new perspective. Don’t give up so quickly!
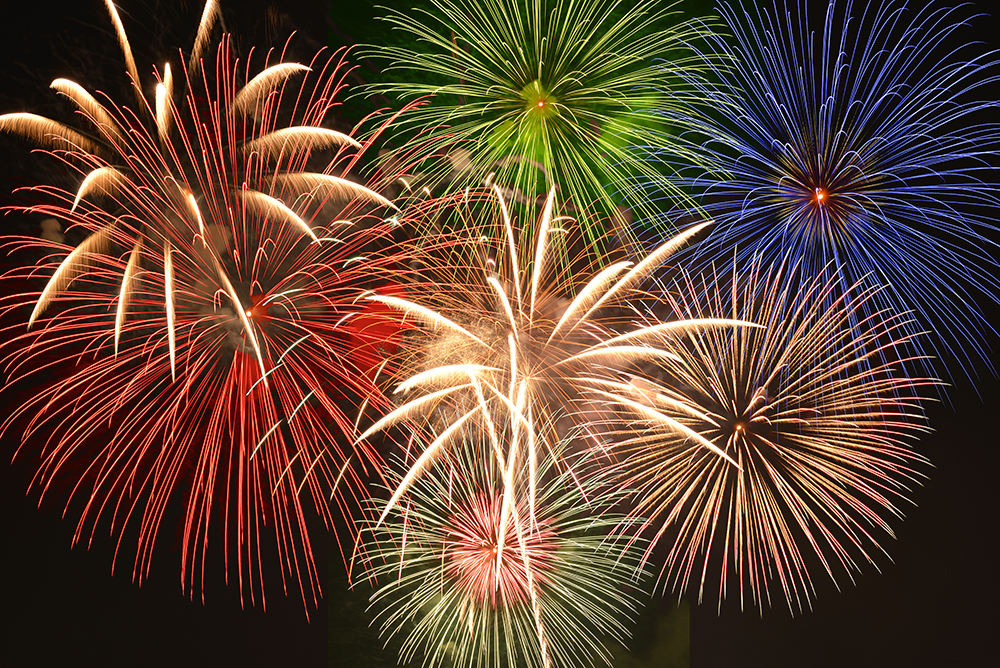
Fireworks are relatively easy to photograph. It should be clear that something like this cannot simply be photographed by hand. With a little luck you can even use compact cameras. If you want more, you should use a manually operated camera. Also recommend a safe stand with a tripod or center punch cushion. In the simplest case, the camera can also be positioned reasonably firmly on a “grain cushion”.
The most important thing when photographing fireworks is that the camera is safely and securely installed throughout the exposure. Because the principle is as follows: The camera exposes for several seconds and captures everything that is going on in the sky. In other words, we’re doing a long exposure .
I always take such night shots with a stable tripod. However, simple tripods are also suitable for lighter cameras, especially if you only need something like this for New Year’s Eve. From around 10 € you can get a simple tripod. Another possibility is the so-called “grain pillow”. To do this, you simply fill z. B. rice or peas in a bag, closes this and thus receives an individual base on which you can align the camera firmly. Disadvantage: Of course, something like this only works on a raised surface such as a table. But if you want to photograph the fireworks outside on New Year’s Eve and not from the balcony, you cannot avoid a tripod.
What must be set on the camera for fireworks?
The very simple way: no manual mode available
I already mentioned it at the beginning: The best thing is that the camera has a manual mode (“M”). If you cannot take photos manually with your camera, you can try the following:
The camera sits firmly on a tripod or something similar. Set the camera’s programmer knob to either AV mode (for Nikon A) or TV mode (for Nikon “S”). Or you simply select the program mode “P”. However, it must be possible to switch off the flash! With such compact cameras, however, make sure that you actually only have the sky in the picture and not a brightly lit object or a house wall!
Press the camera’s shutter button. The autofocus won’t find anything (it’s all black) and will eventually adjust to “infinity” – just right for fireworks in the distance. Now the camera initially only sees black and exposed and exposed (hopefully long enough). During this time, however, the fireworks are ignited and wander through the image, so to speak, or leave information on the camera’s chip, which is shown as the tail that you know from other photos or that you want to photograph yourself.
At some point the exposure will end automatically. With luck, you will be as a sufficient number of “tails” of fireworks recorded have. If your camera breaks the exposure immediately after a second even in the dark, it is unfortunately not suitable for this technique. You can easily try it out in a dark room at first.
The camera has a manual mode “M”
Here it gets a lot more interesting. In manual mode, fireworks can be photographed much better at night! After the camera has been placed on the tripod, it starts:
Set the M mode and deactivate the built-in flash here (or leave it folded in).
First manually set the ISO value to 100, at least to the lowest number that is possible.
Set the aperture to 8 or 11.
Set an exposure time of approx. 30 seconds on the camera.
Set the white balance so that the camera yellow light which awaits: So you select “sun” or better yet “light bulb”. Otherwise the photo will be too yellowish.
Manually set the focus to infinity.
If possible, take photos in “RAW mode” so that you can process the images better later.
Wait for the fireworks to really go off and press the trigger!
I put my Nikon on my Triopo tripod and exposed the longest time I could set with the Nikon DSLR: 30 seconds. I continued to work with the settings above: ISO 100 and aperture 8. However, I made a mistake with the white balance: I chose neutral light or “flash”. The light of the fireworks is not white but already very yellowish to red. In addition, the fog scattered the yellowish-reddish light all around.
I used an old analog Nikon wide angle with manual focus, which can easily be connected to modern digital cameras . Due to the long exposure time, I was able to photograph several fireworks following one another on just one picture!
Taking pictures in fog
Actually, I’m only semi-happy with my fireworks photos. For me they are far too red-tinged and not clear / brilliant enough. On the other hand, they are a good example of what fog can do and an incorrect white balance on the camera. Due to the prevailing fog, all the lights of the city (all the street lighting and also a lot of fireworks that took place on the ground) were reflected and thus also visible in the sky. You have to imagine fog or haze as billions of tiny mirrors that “float” in the air and reflect (unfavorable) light towards the camera. That is simply unfavorable for brilliant images! It’s just like stargazing. The lights of the city are just as annoying there as they are in the haze in the sky.
I will also use a white balance on my camera next time, which corrects tones that are too yellow / too red. The white balance program “incandescent lamp” or “artificial light” would be ideal here. We don’t see it, because our brain automatically corrects something like this: The light from the incandescent lamp is similar to the yellow light from the street lighting, which is disturbing here. But the camera relentlessly reproduces something like that. Without white balance, the photos would get too strong a yellow cast, especially with such long exposure times.
“Catch” the fireworks even longer with long exposure
You don’t necessarily have to rely on e.g. B. Limit 30 seconds. If you have a remote release for your camera (unfortunately I don’t have something like this for my Nikon [yet “]), you can theoretically expose the whole night or capture the entire fireworks display in just one single picture. The exposure time on the camera is set to “B”. “B” means bulb. This term comes from the old days of photography, in which a small balloon was screwed to the shutter release of the camera using a thin hose and an air pressure was generated by applying pressure, which activated the shutter release. With modern cameras this happens either via a cable or even via radio. In any case, the camera now exposes exactly until you press the shutter release again. At 100 ISO and over 30 seconds, however, I would close the aperture of the lens further, otherwise the sky will be too bright: From 30 seconds I use aperture 11; from 60 seconds f-stop 16 and from 2 minutes fireworks f-stop 22.
If you want to expose even longer, we recommend using an ND filter . Then, however, it may be that the individual lights of the fireworks get too dark, because they only act on the camera’s chip for a few seconds. It may be possible to make them brighter again later in the image processing by changing the so-called “gradation curve” or by increasing the contrast.
A tip on composition
When photographing fireworks, I always make sure that not only sky + rockets are shown. Personally, that’s a bit too arbitrary for me. I always try to take pictures of other picture elements: trees, for example, or houses that are beautifully illuminated by the colorful fireworks.
If you want to be very colorful, in addition to the long exposure of the actual fireworks, you can manually flash the surrounding houses in the picture with a flash and a weak color filter in front of it during the long exposure. But don’t overdo it here. Because if you only flash very subtly, you will get the impression that this colored light is coming from the fireworks themselves! With such a trick you create an illusion or an even greater expressiveness of the image.
This tip does not always make sense, but it is definitely worth a try for motifs with nearby (up to approx. 20 meters) houses, walls, trees, etc.
Pay attention to the battery consumption
If you have installed your camera on a tripod outside (e.g. on a small hill) and are now waiting for the fireworks to be lit, you have a spare battery for the camera in your pocket as a precaution! The camera quickly drains the battery during long exposures! At least my Nikon DSLR does.
The trick with the black box
Finally, a tip that I already gave in my article about long exposure times: If you have longer exposure times, have a black box with you! I swing the box in front of the lens in the empty phases, i.e. when a certain time elapses between the individual fireworks (of course so that I don’t touch it). With this shadowing I achieve the following:
The sky is not brightened unnecessarily and the contrast between the sky and the fireworks is increased significantly: the images become more brilliant!
In this way I prevent continuously illuminated elements in the picture from being unnecessarily overexposed (e.g. street lamps).
If someone walks through the picture with a sparkler, it leaves an unwanted tail. I quickly hold the box in front of the lens and then pull it away again just as quickly.
After the aforementioned empty phases, i.e. when new rockets are just rising up in the sky, I release the lens again. Curious looks are guaranteed when you use this technique to photograph the next fireworks display together with other photographers.
Or does your digital camera have a (as real as possible) multiple exposure function? Then you can record several sequences of the fireworks in one picture by double exposures and do not have to expose in a whole piece but several times (shorter) one after the other. Of course, a tripod is also essential here.
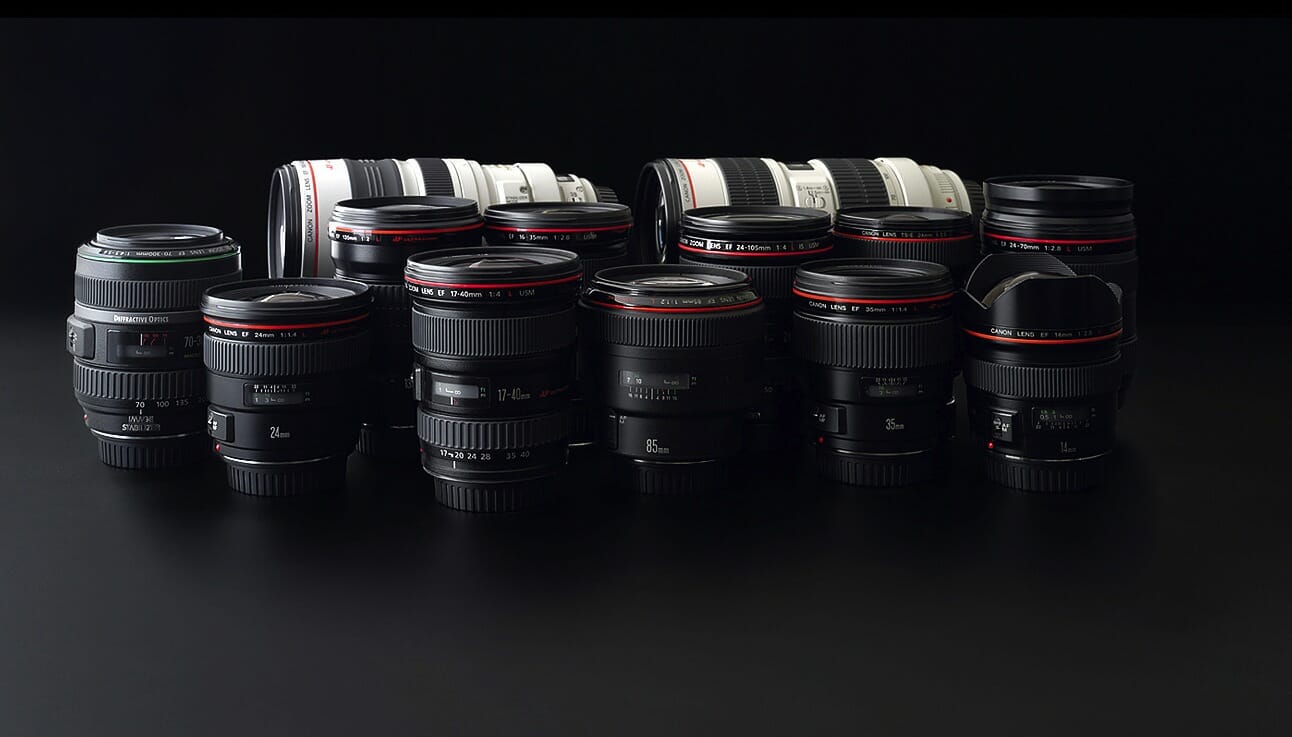
How do you find the perfect lens? To be honest: I have no answer to that. But I can show you how to find the right lens. I have a couple of criteria that are crucial for this.
Quality of the lens
With lenses, of course, the first impression counts. What material was used for the lens? There are lenses that are made from 100% plastic; even the glasses. Now it depends on your requirements. It is not bad to use a cheap lens, but if you want to take photos in the rainforest, I would advise against such a lens.
For beginners, I recommend a cheap zoom lens or a fixed focal length. If you are in the advanced field or even in the professional field, you should rely on first-class workmanship and weatherproof lenses, especially when it comes to sharpness and strong weather influences.
Most manufacturers have special series for this, such as the Sigma ART series, the Canon L series or the Nikon series with the golden ring on the lens. These are built in such a way that they can withstand dust, dirt, moisture and temperature fluctuations much better.
Focal length
The focal length is not decisive for the quality of a lens, but you should definitely include it when planning your lens purchase. This should match the area and the way you are photographing. There is no point in buying a lens that covers every focal length . On the one hand it makes a lazy photographer and on the other hand the quality drops. If the lens can cover a larger focal length range, you usually have a dull picture and a lower light intensity.
Extreme focal lengths also have an impact on quality. If the focal length is in the extreme wide-angle or telephoto range, the lenses are often very expensive or quality losses can be expected. This can be blurring or distortion.
Light intensity or maximum aperture
The light intensity is decisive for many when it comes to lenses. With a high light intensity, you can open the aperture wider and get significantly more light on the image sensor. This makes it possible to take pictures in dark light situations without increasing the ISO value .
So if you often take photos in such situations or if you have a blurry background (i.e. you need a shallow depth of field) you should pay attention to an appropriate aperture .
The aperture can be opened much wider, especially with fixed focal lengths . With zoom lenses, a corresponding revelation is usually associated with a higher price.
Sharpness
From my point of view, this is extremely important. If the lens is sharp, you get completely different images. This cannot really be copied with image processing.
With different glasses and significantly better processing, a completely different sharpness and a completely different contrast can be achieved.
I can promise you that here, of course, but what do you think if I just show you. The following images are both unprocessed and not sharpened. One was made with a € 100 prime lens and the other was made with a € 750 prime lens.
Optical resolution
Let me elaborate on the previous part. Because what we perceive as sharpness is called optical resolution. This optical resolution indicates how many lines the lens can display. It’s kind of like an eye test at an ophthalmologist. The finer the lines that can be displayed, the higher the optical resolution.
I have the following opinion on this: The lens should match the camera. It is much more beneficial to use a high-quality lens on a cheap camera than the other way around. Sure, 50 megapixels sound great in a camera, but if the lens can’t reproduce it, they won’t do anything. The many pixels on your camera are then just mud.
But don’t just rely on laboratory tests. Try lenses for yourself.
Bokeh
Bokeh not always back. Anyone who thinks that this is just a blurry background will quickly be taught better. Because depending on the lens, you get a completely different blur in the background. But let me show you more in the following example.
In this picture you can see the 50mm 1.8 from Canon and the 50mm 1.2 from Canon. Both set to f / 1.8. If you pay close attention, you will see that the 50mm 1.2 has a much softer background. Of course there is about 1000 € between the two lenses, but I wanted to demonstrate that you get a completely different bokeh .
If you can’t really see that difference now, then you don’t really need to worry about a more expensive lens. At least as far as the bokeh is concerned 😉
Close focus limit
This is interesting for all macro photographers.
Every lens has a close focus limit. This unit describes the minimum distance between the subject and the image sensor. If the subject is closer to the sensor, the lens can no longer focus and the image becomes blurred. Incidentally, it does not matter whether you focus manually or automatically.
So if you like to get close to your subject, you should pay attention to this value and combine it with the correct focal length . A minimum distance of 2.2 meters sounds a lot, unless you use a focal length of 600mm. It all depends on the right combination.
Autofocus
Auto focus is very important with a lens. Of course, otherwise, all images would be out of focus, but what exactly makes a good autofocus?
Speed
Faster is better? In any case, it should also be precise. It’s not just up to the camera how fast your autofocus is, the lens also has a part in it. Because the glass elements in a lens have to be moved in order to change the focus. A more powerful engine or a more sophisticated system can change a lot here and be decisive for a sharp photo.
Precision
What good is a great lens if it is often wrong? Well, it’s not normal for lenses to be wrong, but there’s a moment when they do. This is due to the back or front focus. With DSLR cameras, this is to blame for the fact that your subject can be blurred. This can often be adjusted with cameras, but it is laborious and not possible with every camera model.
Balance front or back focus
Video player
00:00
15:38
Incidentally, this problem does not exist with DSLM cameras. Due to their design, these are not prone to this error.
But why am I addressing this topic? With third-party manufacturers in particular, it can often happen that the focus is far off. This became known especially at Sigma with the 35mm 1.4. This lens is only half the price of the Canon original, but many have complained that the autofocus failed and went wrong far too often. Once calibrated and the lens is just awesome…
Noise
Probably less important for most people, but if you want to film or take photos in an environment in which you should avoid loud noises, this point is important. I recommend an ultrasonic motor here. This technology ensures almost silent focusing.
Image stabilizer
The image stabilizer is a great tool that offers great support, especially in low light or high focal lengths. But it is not only there to avoid blurring with the free hand, but also to be able to expose longer. You may still remember the rule of thumb from the exposure time . If we apply this, we can only expose for a certain time. What if we want to expose longer? Then an image stabilizer can help 🙂
A good image stabilizer can give you a buffer of 2, 3 or even 4 f-stops in exposure time . If we apply the reciprocal shutter speed rule, in which the exposure time corresponds at least to the focal length , we come to the following result.
Focal length
min. time
Stabi 2 panels
Stabi 4 panels
25mm
1/25
1/8
1/2
100mm
1/100
1/25
1/6
200mm
1/200
1/50
1/13
400mm
1/400
1/100
1/25
So if you often shoot in situations where you are photographing still subjects on your free hand, you should definitely consider using an image stabilizer. It is helpful in many other situations as well. You will almost always benefit from an image stabilizer and if not, it can simply be switched off 😉
Distortion
Most lens distortion occurs in the wide-angle range. Then the edges of the picture are shown distorted and your motifs are unreal. If you like to photograph architecture, that’s something extremely annoying and the photo quickly looks unprofessional and ugly.
Even if these errors can often be corrected easily in image processing, it doesn’t do any harm to have a lens that does not allow such errors in the first place. Above a certain price range, the distortion becomes less and less and sometimes disappears completely. But remember: The whole thing is based on physics. This can only be tricked to a certain extent. This means that from a certain focal length it does not matter how expensive your lens is, such distortions occur.
The extreme example with an 11mm fisheye lens
Vignetting
In addition to the optical distortion, it can happen with lenses that the edges of the image are darkened or blurred. The darkening is something that I actually really like. In portrait photography in particular, this effect ensures that the viewer’s gaze focuses more on the center of the picture and the subject. If you want to place the motif in a different place, that is again unfavorable. However, at least the dark edges of the image can be easily removed in image processing.
Stray light
Have you ever photographed in the sun with your mobile phone and the picture was simply outshone and nothing really visible? That’s a different matter with high-quality lenses. Extreme light situations and backlighting in particular ensure significantly less reflection and a natural contrast with the appropriate compensation and value .
Chromatic aberration
Chromatic aberration is a color fringing that can appear on contours. But don’t worry, you can get a grip on this quite easily in image processing.
Now what’s a good lens?
Unfortunately, I can’t tell you that, because this feeling is completely subjective. Everyone has different demands on their lenses and different ideas about a good lens. However, I have a few tips on how to use the previous points to find exactly what you are looking for. Even if the last points sounded like everything could easily be corrected while editing, it is definitely not so. A good lens can make a difference like day and night. You don’t believe me
Borrow lenses before you buy them!
Borrow a lens before you buy it. But not just any run-of-the-mill lens. Also take a high quality one. My world and my understanding of good pictures changed completely when I tested the Canon 50mm 1.2. I didn’t buy it and went for a Sigma lens, but it’s worth it just to find out what’s possible.
This DJI Air 2S Fly More Combo Drone is in good condition and fully working order.
(There could be small scratches on the surface, but it does not affect functionality.)
To provide the best experiences, we use technologies like cookies to store and/or access device information. Consenting to these technologies will allow us to process data such as browsing behaviour or unique IDs on this site. Not consenting or withdrawing consent, may adversely affect certain features and functions.
Functional
Always active
The technical storage or access is strictly necessary for the legitimate purpose of enabling the use of a specific service explicitly requested by the subscriber or user, or for the sole purpose of carrying out the transmission of a communication over an electronic communications network.
Preferences
The technical storage or access is necessary for the legitimate purpose of storing preferences that are not requested by the subscriber or user.
Statistics
The technical storage or access that is used exclusively for statistical purposes.The technical storage or access that is used exclusively for anonymous statistical purposes. Without a subpoena, voluntary compliance on the part of your Internet Service Provider, or additional records from a third party, information stored or retrieved for this purpose alone cannot usually be used to identify you.
Marketing
The technical storage or access is required to create user profiles to send advertising, or to track the user on a website or across several websites for similar marketing purposes.