On the one hand, this article is not intended to be a doctrine set in stone. On the other hand, it should be more about the technical details in photography that the snappers may not even know about, but which are valuable techniques for the careful photographer when it comes to the photographic implementation of an idea. What are the classic differences?
Table of Contents
• My friend, the clicker
• The best image quality of a lens
• Do not stop down too much: diffraction blur
• Do not choose the ISO value too high
• Use a tripod
• Types of light in photography
• Turn off the autofocus, avoid a blurry foreground
• Correct exposure: expose on the shadows
• Use the measured value memory of the camera
• Use the white balance correctly
• Distortions and Converging Lines
• Use of artificial light
• Develop a concept
My friend, the snappers
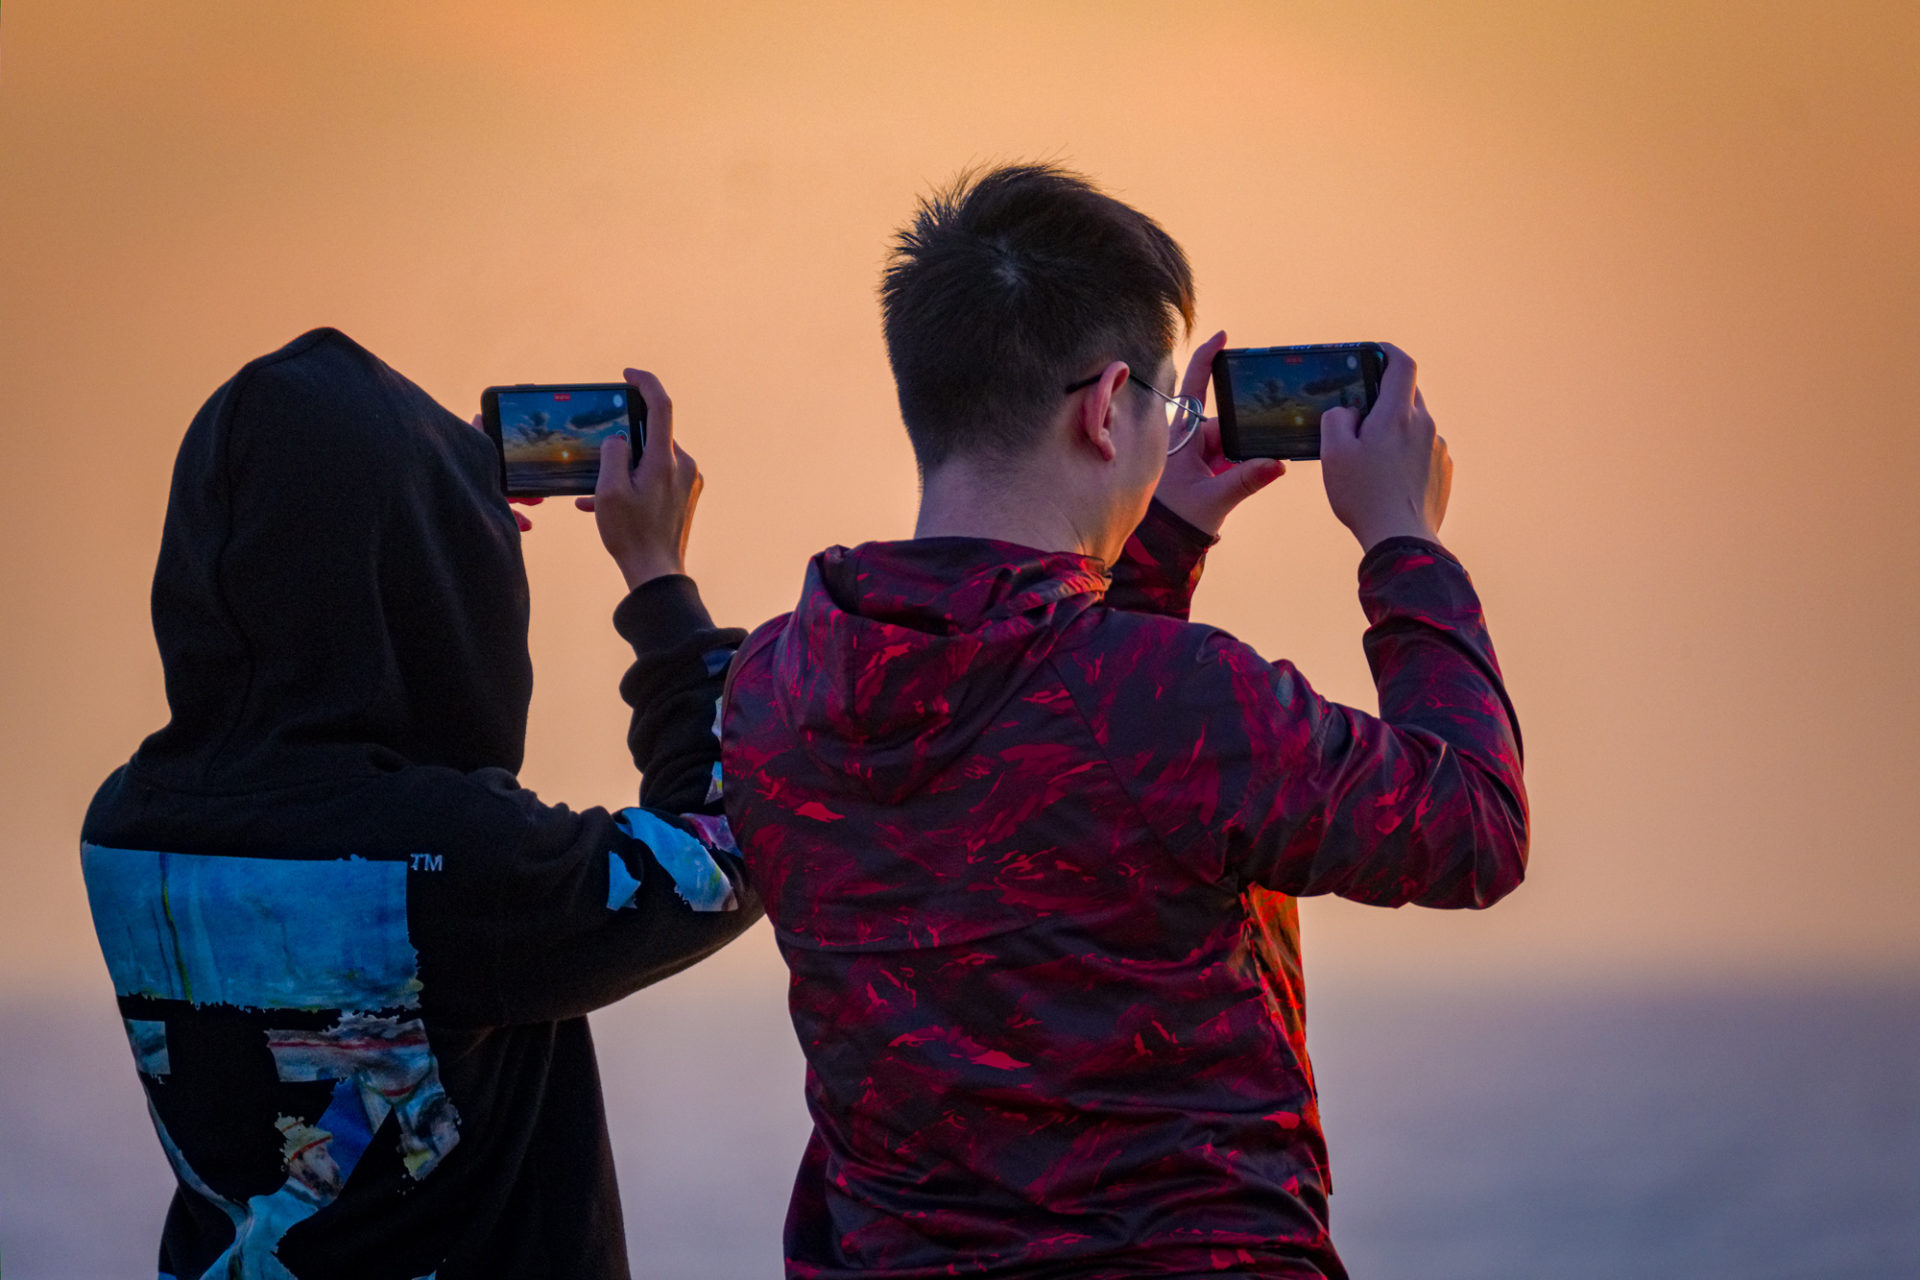
The expression “camera snappers” (following from the German designation of “knipster” means someone who just presses the shutter release without any great consideration), yet often pretend to be a “serious photographer”
I have a good friend who has been the owner of a modern digital single-lens reflex camera that is quite usable in terms of quality. Since the 1980s, such cameras have had a “P function” (automatic program) or, even better, an “auto function”. You don’t have to worry about anything anymore, the camera will fix it. At first I think that’s really good! Because how cumbersome is dealing with physics when you just want to make good pictures. The snappers have a clear advantage here. In detail, however – and by “detail” I mean looking at a large print and not the preview on a small screen and on the other hand reproducibility – you will not infrequently be able to detect certain technical errors that can be circumvented by mere specialist knowledge. Specialist knowledge, which, for example, do not acquire professional photographers for free and initially spend a lot of time on a certain degree. There are some classic differences here with regard to the operation of the photographic apparatus.
In any case, my friend, the snappers, works as follows: He points his camera at the subject and looks at the display of his digital camera via live view. Now he turns any cogs until the displayed “live image” appears as he imagines it and then clicks. When I observe this way of working, the hair on the back of my neck easily stands on end. It’s almost as if a cook simply added sugar to the pot if the finger test was too salty. Concretely screwing maybe if there is an insufficient shadow drawing (I don’t think he knows what this is) he simply high the ISO value or opens the aperture without being aware of the consequences. If he is happy with it – very much! I certainly don’t want to take the fun away from him. But there is another way. And with a view to reproducibility and attention to detail, you should know a few basic things about photography:
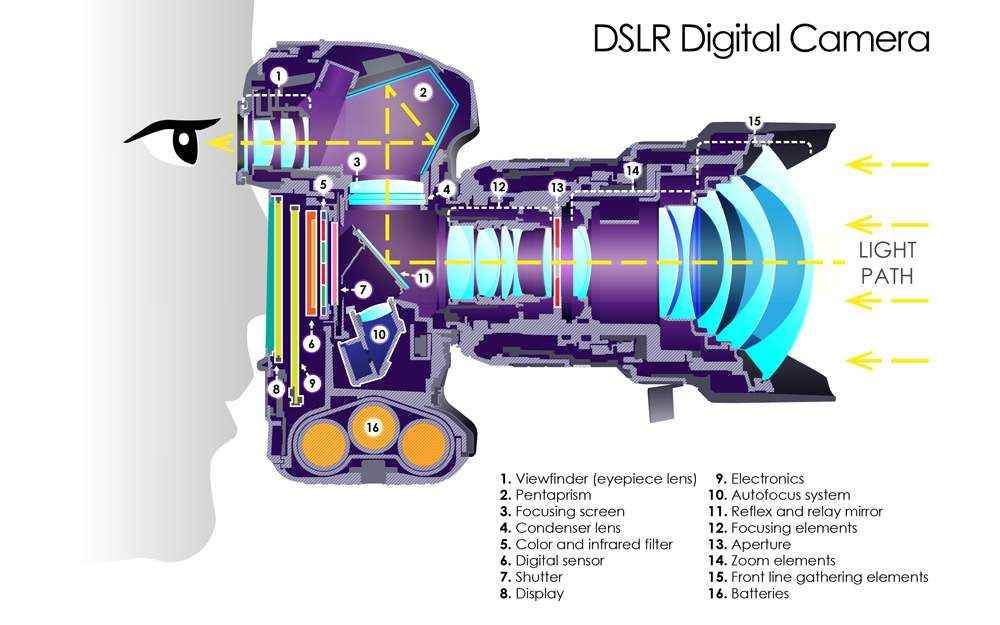
The best image quality of a lens depends on you
A lens is a light collector: a lens system absorbs all the ambient light that it “sees” and bundles it into a focal point. The aperture can be used to “sort out” the area of the light rays that hit the technically most unfavorable surfaces of the lenses – and these are their outer areas. Consequently, you should go for the best possible picture dim.
Every lens achieves the best image quality technically if it is stopped down by two to three values (English “stops”). A stop is a doubling or halving of the amount of light let in when taking a photo.
For the most precise representation you should use a lens whose light intensity 1: 2 is stopping down to approx. F / 5.6, provided that you do not get into trouble with too high a depth of field or too long an exposure time, if the ambient light is already too dark for a correct exposure or if there is blurring threatens (here the photographer naturally uses a tripod).
Especially zoom lenses and especially the cheap “kit lenses” I would always stop down by at least two f-stops. However, high-quality and correspondingly expensive lenses often leave no questions asked when it comes to precise imaging performance in the corners of the image and with a 100% crop view.
My friend, the snappers, will never know at which aperture he is taking pictures. However, consciously working photographers know that, on the one hand, they naturally control the depth of field with the aperture (this is well known even under snaps) and, on the other hand, they can use the maximum image quality of their lens.
Do not stop down too much: diffraction blurs
However, if you stop down too far, a phenomenon called “diffraction blur” occurs in full format do not stop down to aperture 22, because here the aperture is already closed so far that the incoming light has to squeeze through the aperture blades – like through the doors of a Japanese subway or just bends over: There is a uniform blurring. So this is where dog chasing its tail. Photographs can supposedly depict all the details from front to back, but there is the problem of diffraction blur. On a 30 × 40 cm print, such images will lack a certain degree of sharpness, whereas everything still looked okay on the small laptop screen. If necessary, I stop the lens of my crop DSLR camera (smaller sensor than the full format) down to a maximum of f/11. Then there is a visible diffraction blur.
Do not choose the ISO value too high
Digital cameras have a notable advantage over analog cameras: You can adjust the ISO value (i.e. the sensitivity) for each picture. With an analog camera, this can only be changed by changing the type of film (i.e. by inserting a different film).
Basically, the lower the ISO value, the finer the detail will be. I myself always work at 100 ISO whenever possible. This is how I achieve the maximum image quality in this regard. Above I briefly mentioned the auto function of the digital camera. In this mode there is no way to intervene with regard to the two factors influencing image quality, aperture and ISO value. The best imaging quality is obtained by choosing the lowest possible ISO value and stopping down the lens by about three f-stops.
Use a tripod
I just mentioned the tripod briefly. I almost always use such a device as long as I can transport my tripod according to the situation, because:
Every photo from the hand is blurred – the only question is whether you can still see it.
Imagine you are exposing at a fast shutter speed (exposure time) of 1/250 second. It is really a very short moment. Do you think you can shoot such pictures out of your hand with confidence? Maybe nothing seems to be blurred because the photos are all sharply focused on the small display of the digital camera. Yet, this is a mistake mistake! Because even within this 1/250 second there is hand movement while taking the picture, even if only a slight one. But the more you enlarge the corresponding images, the more you enlarge even the smallest of blurring – and at some point they become visible. However, I want maximum quality and therefore always use a tripod if possible, even with the short exposure times. Even a simple cord tripod can increase the sharpness of the images.
Imagine you are photographing a big balloon: This picture has no so-called “edges”. It will also be shown in focus with a very slight blurring.
However, photograph a single hair and enlarge it to 18 × 24 cm Even a minimal motion blur will affect the image sharpness. Because the edge of the hair will only be shown sharply by using a tripod, because the camera must be positioned absolutely rigid for an optimal result.
This is one of the reasons (maximum sharpness) why some photographers look wander even in broad daylight with heavy tripod-monsters. While on the snappers shoulder a full-format camera swings on their shoulders to their hand and simply again in auto mode clicks are made, without having to think too much.
Of course, such a tripod is also mandatory for a very conscious image composition that is well thought out to the millimeter, as well as for the absolutely vertical alignment of the camera in order to avoid falling lines (see a little further below).
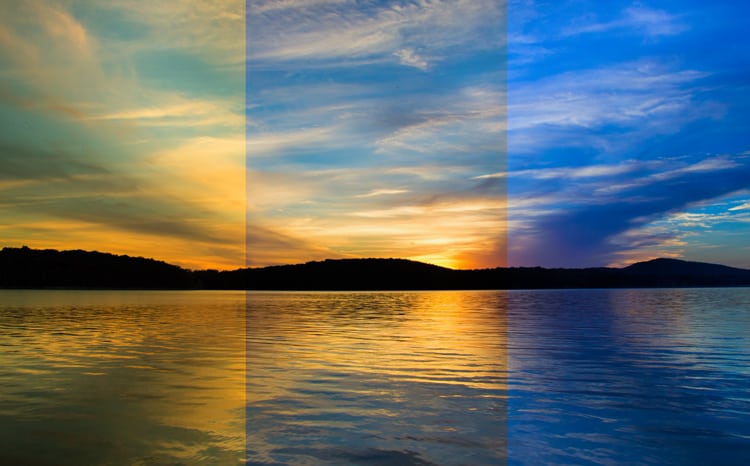
Types of light in photography
The most important factor in photography is – the light. No, it’s not the camera, not the lens. Just imagine: A hundred years ago, carpenters built cameras, not technology companies. These people had little knowledge of photography (because they mainly dealt with tables and massive cupboards): They only had to make light-tight wooden boxes with gear screws and leather bellows. These were very simple devices. Why are we still fascinated by the pictures that were made with such anachronisms? Certainly: there is some romance when looking at these pictures. However, at that time the photographers knew how to concentrate on the most essential thing in photography: the light. (Because quite a few came from academic painting,
No camera can vary the character of light.
Light exists in many different ways. Now imagine you want to photograph a woolen sweater under an overcast sky: The image will clearly show such a piece of clothing. Now the sky breaks up and the sun comes out: This sun alone creates a prompt hard light: Suddenly every fibre of the sweater becomes visible! Consider the following picture:
The snappers simply take photos. The consciously acting photographer only takes photos when the light is favorable according to his imagination – if of course possible. I myself have often returned home frustrated when suddenly bright sunshine prevailed, when I needed a very diffuse and uniformly illuminating one of my plan. Here I wanted to be professional and prefer not to take a picture at all than one that did not meet my expectations. How good it is for the snappers in their modesty.
Turn off the autofocus, avoid a blurry foreground
A particularly noticeable mistake is the ignored foreground. I allow myself to speak of a mistake at this point. Because it can of course also be the case that this should be deliberately set. The snappers focus on the subject. The consciously acting photographer, on the other hand, thinks about from where to, where the focus area should extend and deliberately adjusts the focus point and aperture accordingly. Most of the time this cannot be done automatically.
Correct exposure: expose for the shadows
There is a phrase: Expose on the shadows. Develop according to the lights. This means: Give the camera enough light so that even the darkest picture elements still show detail, but make sure that the brightest picture elements do not appear “eroded” and pure white.
My buddy, the snappers, doesn’t pay attention to anything like that, because he looks at his subject (on the small screen) globally. However, he risks that, for example, the shadows under the trees in the background of his subject lose their richness of detail, because he relies on the simple exposure metering on his digital camera. The result: monotonous black surfaces. A purely technically well-made photography is alive on the other hand, from shades creates the impression of three-dimensionality. Therefore, one should expose in such a way that even the darkest areas of the image still have a hint of drawing (visual arguments e.g. From Anders Petersen, however, prove the opposite). I myself work basically by constantly looking at the camera’s histogram and checking the brightness of the image. So I also look at my photographs locally (in details and not globally).
The most important control tool of a DSLR: the histogram . Based on this, I can see whether all areas in the subject still have drawings. This can hardly be read correctly from a preview image on the small display of the digital camera, especially not in bright ambient light.
Use the measured value memory of the camera
I prefer to take photos in mode “A” (or AV with Canon): Here I preselect the aperture and the camera automatically determines the “correct” exposure time. It usually does this quite well – thanks to “matrix measurement”. For subjects with a high proportion of very bright areas, however, even the most intelligent metering method tends to be underexposed.
Use the white balance correctly
Often the so-called white balance is set to “Auto”. That’s a good thing, because in most cases the colors are reproduced realistically.
Distortions and Converging Lines
This point is mostly only relevant when taking pictures of houses or tall buildings. What photographers know: If you move the camera out of the absolutely vertical position, all vertical lines (e.g. buildings) narrow upwards. In concrete terms, this means: Buildings are depicted like houses of cards that appear to tilt backwards. There are two remedies: On the one hand, you can of course use a real shift lens. On the other hand, the photo can be later be rectified on the computer with image processing. Here, however, there is a problem: The rectification on the computer is always accompanied by a certain amount of cropping. So you lose a bit of resolution. You have to take this crop into account when taking the picture and consequently move a little further away from the subject or use a slightly shorter focal length or zoom setting of the lens so that you will have enough margin on the photo, which later has to be partially cut off again.
The photos of “snappers” are often marked by restlessness, which is expressed by converging lines, careless areas of blur and unfavorable light.
Use of artificial light
Even with the built-in flash, you can skillfully create subtle effects.
Flash units seem to be rather inconvenient for most snappers. They are only used as an emergency solution if it is too dark and a flash would destroy the natural light mood of the picture. That’s true at first, but only if you don’t know how to deal with it.
Have you ever wondered why a dedicated wedding photographer wouldn’t want to part with his flash on the camera even in the most beautiful sunshine? It’s bright enough here. Correct. However, the wedding photographer does not use artificial light as the primary light source (this remains the sun). He uses the flash as a so-called fill light or “fill flash”.
Because what does the sun cause? Well shadow! The high-lying sun creates dark shadows under people’s eyes and creates high and disturbing contrasts within clothing. With a flash, however, such shadows can easily be brightened in such a way that the inexperienced viewer does not even notice that an additional flash has been used. The flash unit also creates a slight brightening effect (people stand out slightly from the background) and a so-called “catch light” in the eyes (a sparkle). The photographer almost always uses a simple clip-on flash, but its light output is somewhat more subtle. As a result, he easily gets exempted people. This effect is not noticeable as “over-flashed”, but provides a certain brilliance in the foreground (well, sometimes it doesn’t quite succeed).
It is clear that the intensity of the additional artificial light source must never be set too high for this! Otherwise it will look as if portrayed people are standing in front of a photo wallpaper.
Develop a concept
So far, I’ve only ever written about techniques with which the tool (the camera) can be operated precisely so that the image results can exactly match the ideas.
But what kind of ideas do you have about photography? An elementary component of “conscious” photography is to think about it beforehand (instead of just snapping around wildly). I often work in series. So I dedicate myself to a very specific topic with my pictures and always prepare the pictures with this idea in mind. Of course, it is important to me that the parameters (a type of light, depth of field, color saturation …) remain the same as possible for all individual photographs. So I keep my handwriting, so to speak at and don’t change anything here.
The photographic topic itself is a broad field: You can deal with documentaries or with a certain milieu, with landscape shots at a very specific time of the day, with interior portraits, etc. The only important thing here is that you don’t snap randomly.